We can also use 360 divided by n number of sides of the regular polygon to find the individual exterior angles. The interior and exterior angles add up to 180.
Sum Of All Exterior Angles Of A Polygon
Exterior Angles of a Polygon.
Formula for exterior angles. All the interior angles in a regular polygon are equal. Remember that supplementary angles add up to 180 degrees. Each exterior angle is the supplementary angle to the interior angle at the vertex of the polygon so in this case each exterior angle is equal to 45 degrees.
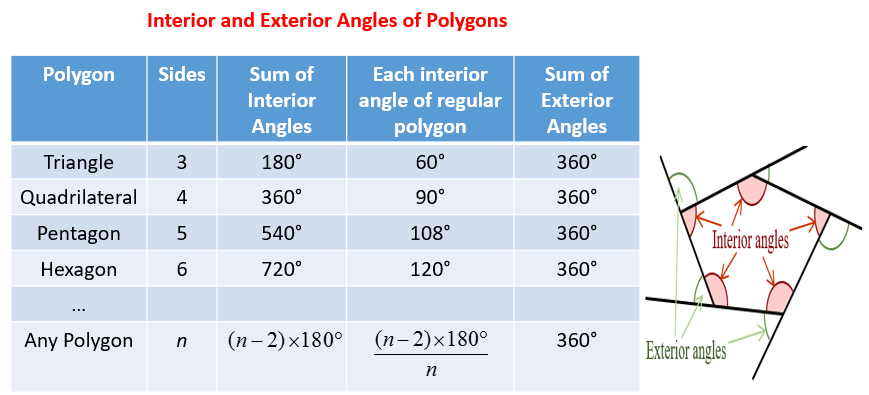
The exterior angles are the angles formed between a side-length and an extension. To find the sum of interior angles of a polygon multiply the number. Interior and exterior angle formulas.
The formula for calculating the sum of interior angles is n - 2 times 180circ where n is the number of. Definition Formula The exterior angle theorem states that the exterior angle formed when you extend the side of a triangle is equal to the sum of its non-adjacent angles. Now we will learn what is an exterior angle.
Every intersection of sides creates a vertex and that vertex has an interior and exterior angle. The formula is where is the sum of the interior angles of the polygon and equals the number of sides in the polygon. Remember our non-adjacent angles are those that dont touch the angle we are working with.
In any polygon the sum of an interior angle and its corresponding exterior angle is. Interior angles of polygons are within the polygon. This works because all exterior angles always add up to 360.
Formula to find the measure of each exterior angle of a regular polygon when the number of sides n given. The interior angles of a shape are the angles inside the shape. The sum of interior angles is 5 - 2 180 540.
The sum of interior angles in a triangle is 180. The other part of the formula is a way to determine how many triangles the polygon can be divided into. With respect to polygon we have four important formulas.
A 360 N Where A is the exterior angle N is the number of sides of the polygon. The sum of the measures of the interior angles of a polygon with n sides is n 2180. The formula for this is.
E x t e r i o r a n g l e 180 - i n t e r i o r a n g l e. Set up the formula for finding the sum of the interior angles. The sum of the external angles of any simple convex or non-convex polygon is 360.
180 Regular and Irregular Polygons. For example an eight-sided regular polygon an octagon has exterior angles that are 45 degrees each because 3608 45. Exterior Angle Formula If you prefer a formula subtract the interior angle from 180.
The other formulas are interior angle of regular polygon sum of interior angles and sum of exterior angles. The sum of the exterior angles of a regular polygon will always equal 360 degrees. Formula for sum of exterior angles.
Interior and exterior angles add up to 180degree 180. The formula can be proved using mathematical induction and starting with a triangle for which the angle sum is 180 then replacing one side with two sides connected at a vertex and so on. 180 - 135 45.
How to calculate Measure of exterior angle of regular polygon. The exterior angle theorem states that if a triangles side gets an extension then the resultant exterior angle would be equal to the sum of the two opposite interior angles of the triangle. The following formula is used to calculate the exterior angle of a polygon.
And since there are 8 exterior angles we multiply 45 degrees 8 and we get 360 degrees. Look at the example underneath. 360 n.
To find the value of a given exterior angle of a regular polygon simply divide 360 by the number of sides or angles that the polygon has. 2 Exterior Angle Theorem. The measure of each interior angle of an equiangular n -gon is If you count one exterior angle at each vertex the sum of the measures of the exterior angles of a polygon is.
It is very easy to calculate the exterior angle it is 180 minus the interior angle. 360 Measure of each exterior angle. From the simplest polygon a triangle to the infinitely complex polygon with n sides sides of polygons close in a space.
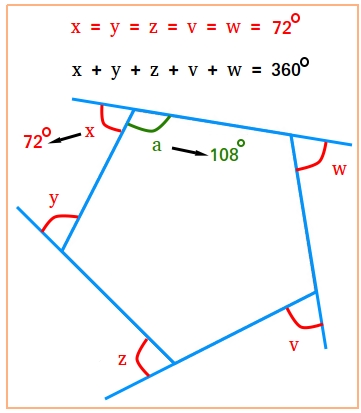
The value 180 comes from how many degrees are in a triangle. The number of Sides is used to classify the polygons. The interior angle is 180 - 72 108.
So when we extend the side of an angle creating a straight line that goes. The exterior angle is 360 5 72. The sum of the measures of the exterior angles of a polygon one at each vertex is 360.
Among them exterior angle of a regular polygon formula is one. Measure of exterior angle of regular polygon is calculated by dividing the sum of the exterior angles by the number of sides and is represented as MOE360n or Measure of exterior angle 360Number of sides.
A_octagon812cdot 12cdot 144969552 units2. That said area of the octagon formula 8 x Area of Triangle.
Ocatgon

Area of an octagon formula.

Formula for area of regular octagon. A regular polygon consists of 8 sides of equal length as well as equal internal angles. But I bet after watching a few examples youll be amazed at how simple it is. The formula for the area of an octagon of regular shape is 2 1 2 side 2 as seen in the figure below.
The octagon can be split into 8 congruent triangles. How to find the area of a regular octagon. Area of the octagon 8 x Area of Triangle.
Area Of An Octagon Formula It has 8 sides and 8 interior angles. The area is defined as the region occupied within boundaries of an octagon. If you want to know how to find the area of a regular octagon by hand the easiest procedure is to apply the standard formula for the area of a regular polygon.
So if we find the area of one triangle and multiply it by 8 we will have the area of the entire octagon. Thank goodness for good formulas. Hence the sum of all interior angles is 135 x 8 1080.
Solved examples Using Octagon Formula. This is fairly easy to prove if it isnt a formula you already know. Regular octagons have sides that are congruent.
The area of a kite with diagonals d and w is XXXAreakite d w 2. All the sides are equal in length and all the angles are equal in measurement. 2 sin²θ 1- cos 2θ.
The area for a regular octagon is given by the formula below where eqa eq is the length of the side. A 2 cot pi 8 a 2. You will learn both the technique and then the formula.
So all you have to do to get the area of the octagon is to calculate the area of the square and then subtract the four corner triangles. Construct rather than measure. Area of an Octagon 2a 2 1sqrt 2 Area of an Octagon 2times 23 2 1sqrt 22554cm 2.
A regular octagon has. But first here are two great tips for this and other problems. Thus the area of an octagon formula could be given as.
In this video you will learn how to find the area of a regular octagon given the side length. Sum of Interior Angles of 1080 20 diagonals. Interior Angles of 135 Exterior Angles of 45 Area 212s 2 or approximately 4828427 s 2 where sside length Width w 12s.
To compute the area of an octagon we first need to divide the octagon into small isosceles triangles. Area of Octagon Hence Area of Octagon Also The area of a regular octagon of side length a is given by. The formula is the following.
A regular octagon can be thought of as being composed of 4 kite shaped areas. Area of regular polygon perimeter apothem 2. The distance from each vertex is a x where a is the length of the side of the octagon and x is the length of the leg of the isosceles right triangle that is cut off of each corner of the square but x a is half of the diagonal of the square.
Given side of the octagon 23 cm. Now calculate the area of one triangle and multiply the value by eight. Find the area of the regular octagon in Example C.
The solution to the equation is straightforward and this is the formula used in our regular octagon area calculator. Irregular polygons are not regarded as consisting of a centre and are asymmetric as well. Each interior angle measures 135 degrees.
Area of the octagon is given as 8 x Area of Triangle. 2 cos²θ 1 cos 2θ. For problems involving regular octagons 45- 45- 90 triangles can come in handy.
Calculate the area and perimeter of a regular octagon whose side is 23 cm. The area of a regular octagon of side length a is given by A 2 cot π 8 a 2 2 1 2 a 2 4828 a 2. Displaystyle A2cot frac pi 8a221sqrt 2a2simeq 4828a2.
The Area of an Octagon Formula is AreaofanOctagon2a212AreaofanOctagon2a2 12. There are a total of 20 diagonals in a regular octagon. Construct a regular octagon from a square of side length s.
Area of an octagon. The exterior angles of a regular octagon are all 135 degrees and the interior angles are all 45 degrees. On the other hand in an irregular octagon there are 8 different sides.
This looks a little intimidating right. So when an octagon is a regular octagon it means that all of its sides are of equal length.
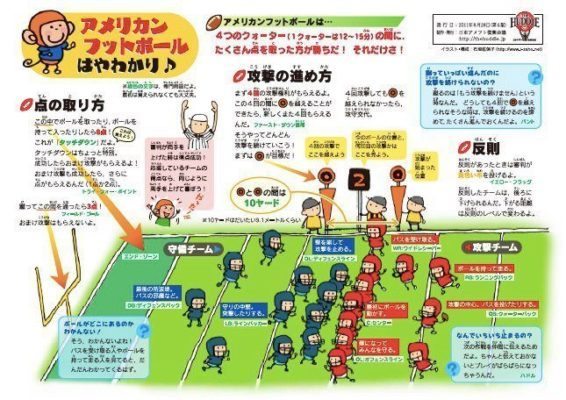
Football features two teams playing against each other. The group of offensive players the running backs and quarterback who line up behind the line of scrimmage.
American Football Explained
Bend one leg up behind you using one hand to steady yourself against the wall and the other.
Football basics for dummies. The endzone is 10 yards long and contains the field goal which is situated directly outside the back of the endzone. What is the Super Bowl. While learning NFL rules may take some time knowing the basic football rules can dramatically increase ones enjoyment of the game.
Whether its to pass that big test qualify for that big promotion or even master that cooking technique. People who rely on dummies rely on it to learn the critical skills and relevant information necessary for. Get in on all the playbyplay action of professional and college football.
Downs are the most fundamental part of NFL play. The purpose of the game is to move the ball into the oppositions end zone either by running with the ball until tackled or by passing the ball to a teammate downfield towards the end zone. The actual playing field for football is 100 yards from endzone to endzone.
Discover unique things to do places to eat and sights to see in the best destinations around the world with Bring Me. Eighttime Pro Bowl defensive end awardwinning TV commentator and actionadventure movie star Howie Long takes you into the huddle and onto the playing field with Football For Dummies a complete look at all the plays positions and penalties of the game along with plenty of gameday insight and. Join us as we take you through the basics of American Football.
See more football drills tips or find a football camp near you. And if thats you then weve got you covered with our American Football basics. This is done by either running or passing the ball down the field.
The Basic Rules of Football The Football Field. The offensive team moves the ball forward in sections of at least 10 yards. Dummies has always stood for taking on complex concepts and making them easy to understand.
The following list fills you in on the basic American football terms you need to know. Each time the ball is advanced at least 10 yards within their four chances another first down is earned with four more chances to go a further 10 yards. As these players gear up and get ready to take the field there is one critical thing they should know and thats the basics of how the game works.
A period of action that starts when the ball is put into play and ends when the ball. Their objective is to get the ball to the end zone of their opponent. 9781119553007 from Amazons Book Store.
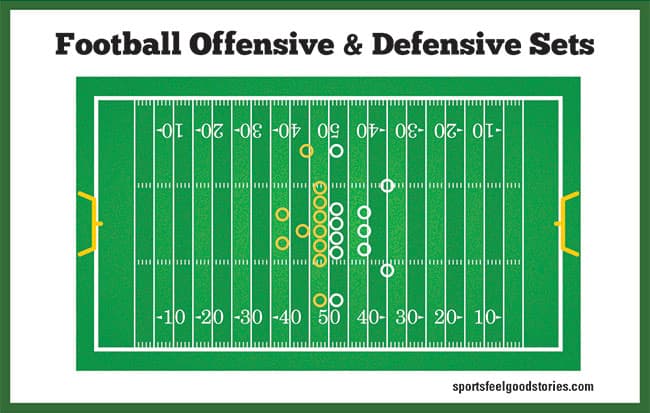
American football that is. The playing field is 100 yards long with a 10-yard end zone for each team. If you are not a beginner please go straight to part 2 of our rules tutorial where we explain some of the more difficult and controversial football rules and specific NFL rules.
Everyday low prices and free delivery on eligible orders. Sit on the. Each team is allowed to have eleven men on the field at.
Dummies helps everyone be more knowledgeable and confident in applying what they know. Though football places an emphasis on winning something valuable can be gained even if you fall short. Although there are only 11 players from each side on the field at any one time a team is actually made up of 45 players.
A down is basically an attempt to move the ball forward. Horizontal lines are painted across the field every 5 yards with individual hash marks each yard to help players navigate. Football is a marvelous sport that attracts thousands of players wishing to participate each fall.
Find out how you should approach winning and losing in youth football. The field has stripes. Scoring is done by the team on offense.
Buy Football For Dummies 6th Edition 6 by Long ISBN. Hamstrings and lower calf. Stretching for Football Warmup Quadriceps.
Downs are the most fundamental and confusing part of the NFL rulebook. That is the entire game in a nutshell but it is more complex than that. The Fundamentals of Football In American football two teams of eleven players each take to a 120-yard field with the ultimate goal of scoring points via a touchdown or field goal.
The team on offense has four downs to move the ball 10 yards forward. The attacking team or offence needs to move the ball forward in chunks of at least 10 yards which is why the pitch has. Below we explain NFL rules basics for beginners.
Sit on the ground. Stand by a wall. The bright lights the stadiums filled with roaring fans the smell of fresh-cut grass.
They have four chances or downs to gain those 10 yards. Join us as we take you through the basics of American Football. With one foot extended out in front of you extend your arm towards your.
The Super Bowl is the final match of the NFL season and is used to determine the leagues.
ROSES FOR DUMMIES is just that. Cut some of the old woody branches to the ground retaining a maximum of six young vigorous stems that can be secured to supports.

26 Rose Gardening Tips For Beginners To Pros Ultimate Guide
People who rely on dummies rely on it to learn the critical skills and relevant information necessary for.

Growing roses for dummies. A veritable encyclopedia of gardening this Gardening AllinOne For Dummies is an indispensable resource for novices and experienced gardeners alike. Saw away any dead stumps at the base of the plant where rain can collect and encourage rot. Easy annuals such as sunflowers and zinnias are simple to start from seed perennials require little care and return year after year and bulbs are practically foolproof when planted properly.
Simply put with the correct amount of water and sunlight and a little bit of grooming your roses should thrive. Red and white hybrid tea. How to propagate roses.
Garden advice on the topic is often presented as a set of rules to follow for proper pruning or roses. A basic A-Z book for those that are new to growing roses. And remember roses are resilient plants.
The new plants will be ready to transplant into the garden after a year. Everything else is in black and white. Inside rosarians of all levels will find useful information on.
Renovating overgrown climbing roses. Each type has its benefits. Planting watering fertilizing pruning and winterizing.
The main components involved with caring for roses that you need to understand are. The roses were polyantha roses named The Fairy. Container roses are a great for novice gardeners because theyre easy to plant and establish quickly.
Everyday low prices and free delivery on eligible orders. Dummies helps everyone be more knowledgeable and confident in applying what they know. The middle pages are devoted to some colorful pictures of roses that the author and editors of the National Gardening Association want you to consider.
Like the RHS on Facebook. Start with just one easy plant or select a few and get growing. FREE shipping on qualifying offers.
They can also be purchased at local nurseries throughout the growing season. Join the RHS today and get 12 months for the price of 9. The Royal Horticultural Society is the UKs leading gardening charity.
Pink and white shrub. Growing Information on Roses. Whether its to pass that big test qualify for that big promotion or even master that cooking technique.
When growing roses its important to choose a site receiving at least six hours of sun each day. You can purchase roses already potted in soil or as dormant bare-root plants. Buy Roses for Dummies 2nd Edition by Walheim Lance The Editors of the National Gardening Association ISBN.
Take the cuttings from this years shoots and plant into pots where they should root in about two months or so. We aim to enrich everyones life through plants and make the UK a greener and more beautiful place. Potted plants can be planted any time between spring and fall but preferably spring.
Start with the roots. Enjoying nature s bounty by growing you own vegetables and herbs. Plant dormant roses in early spring or fall.
It brings together between the covers of a single volume seven great books covering. Miniature pink roses under artificial lights T8 fluorescent lightsI run the lights for 16hours a day in the summer. Rose bushes must also be located in well-drained fertile soil.
Rose pruning can be intimidating for beginners. Nov 3 2012 - This past spring I did some pruning to one of my favorite roses. Read on for growing information on roses.
These are the smallest of the rose plants and they can grow anywhere from six inches to two feet tall. 9780764552021 from Amazons Book Store. Roses for Dummiesdoes away with the myth that roses have to be high maintenance instead showing how to choose a type that will blossom in your care.
These roses flower continuously and are great for container gardening making borders and for growing in a small space. The easiest way is to take softwood stem-tip cuttings in early to mid spring. Follow these ten essential rules to learn how to grow roses.
Remove all dead diseased dying and weak shoots. These easy-to-grow flowers will help you gain confidence in the garden. The plant needs a winter dormancy outsi.
Dummies has always stood for taking on complex concepts and making them easy to understand.
Converting Polar Coordinates to Cartesian Relevant For. So that we can check where we did wrong in calculating 4 20201015 0635 Male Under 20 years old Elementary school Junior high-school student Useful Purpose of use To find the polar and cartesian coordinates for some given top of an equilateral triangle and the slope of the left-side line of the triangle assuming that the base starts on.
Rectangular Polar Coordinates Calculator
046197382 007034582 089015703 106227375 129780158 032823362 099823096 0.

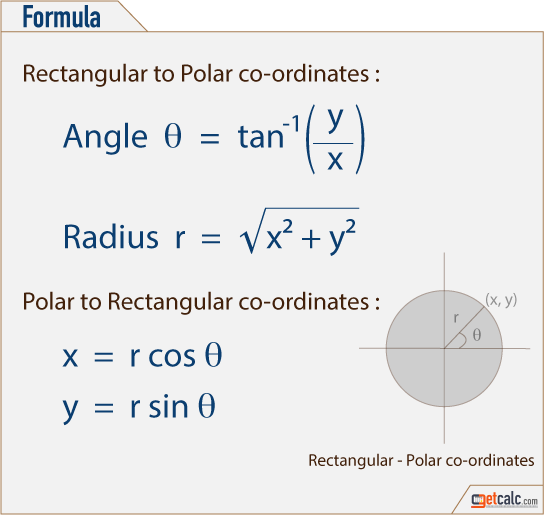
Convert cartesian to polar. Why do Polar Coordinates and Equations exist. In this section we will look at converting integrals including dA in Cartesian coordinates into Polar coordinates. The program is very easy before looking into the program we must the two basic formulas for the conversion.
Write a NumPy program to convert cartesian coordinates to polar coordinates of a random 10x2 matrix representing cartesian coordinates. When we know a point in Cartesian Coordinates xy and we want it in Polar Coordinates r θ we solve a right triangle with two known sides. By using this website you agree to our Cookie Policy.
Hemang Agarwal jatin yadav and Mahindra Jain contributed The polar coordinates are defined in terms of r r r and θ theta θ where r r r is the distance of the point. To do this you need to be familiar with many trig. Understanding the goal is important to help you avoid getting stuck midway.
I now work the other way round and show you how to convert equations of Cartesian curves to polar form. But if it is in the form of a Cartesian equation your focus is converting to rs and θs polar equation. To convert from Cartesian Coordinates xy to Polar Coordinates rθ.
To improve this Polar to Cartesian coordinates Calculator please fill in. Ignore the circles on the plot for a second and picture the rectangular system youre familiar with. Free Cartesian to Polar calculator - convert cartesian coordinates to polar step by step This website uses cookies to ensure you get the best experience.
Use Pythagoras Theorem to find the long side the hypotenuse. If the problem you want to solve is in the form of a polar equation the goal is converting to get the right ys and xs Cartesian equation. C Program to Convert Cartesian Coordinates to Polar Coordinate.
To Convert from Cartesian to Polar. Algebra Polar Coordinates. To convert a point from the Polar Coordinate System to Cartesian Coordinate System the functions sine and cosine are used to solve for the x and y component of the point.
In mathematics a Cartesian coordinate system is a coordinate system that specifies each point uniquely in a plane by a set of numeric points. Xr cosθ yr sinθ found it. The conversion between cylindrical and Cartesian systems is the same as for the polar system with the addition of the z coordinate which is the same for both.
Calculus Polar Equations. 1 r x²y² 2 θ tan-¹yx were coordinates of a point is xy r distance from the x and y-axis. Convert the Cartesian coordinates 3 4 34 to polar coordinates r theta rθ where theta θ is in radians and approximated up to two digits below the decimal point.
Polar coordinates exist to make it easier to communicate where a point is located. Cartesian coordinates in the figure below. Convert the following into polar form.
23 A Polar coordinate system is determined by a fixed point a origin or pole and a zero direction or axis. R x 2 y 2 θ tan -1 y x This python programs converts Cartesian Coordinate given by user to Polar Coordinate using Cartesian to Polar Conversion Formula. Quick conversion to cartesian coordinates after reading polar coordinates from graph 10 20200117 0215 Male Under 20 years old Elementary school Junior high-school student Very Purpose of use trying to find this formula.
R 2 x 2 y 2 tan θ y x and z z x r cos. Get the free Convert Complex Numbers to Polar Form widget for your website blog Wordpress Blogger or iGoogle. In mathematics the polar coordinate system is a two-dimensional coordinate system in which each point on a plane is determined by a distance.
Thank you for your questionnaire. Program for the conversion of cartesian to polar coordinates. Thetarho cart2pol xy transforms corresponding elements of the two-dimensional Cartesian coordinate arrays x and y into polar coordinates theta and rho.
R 2 12 2 5 2. Cartesian Coordinates is represented by xy. Import numpy as np z nprandomrandom102 xy z0 z1 r npsqrtx2y2 t nparctan2yx printr printt Sample Output.
The regions of integration in these cases will be all or portions of disks or rings and so we will also need to convert the original Cartesian limits for these regions into Polar coordinates. What is 125 in Polar Coordinates. Today Ill discuss a foolproof method -- Cambridge Coachings Five Step Process for converting polar to Cartesian equations.
Lets look at a quick example. In the Cartesian system the coordinates are perpendicular to one another with the same unit length on both axes. A point in the polar coordinate system is in the form of P rθ and a point in the cartesian coordinate system is in the form of P xy.
The obtained θ will be in the from of radians we need to convert the radians into degrees. Sample Solution- Python Code. Find more Mathematics widgets in WolframAlpha.
Y2 8x x2 y2 2 y sqrt 3 x 6. It should include the conversion steps too. R 12 2 5 2 r 144 25 r 169 13.
Use the Tangent Function to.
Next we need to touch on radians. The Six Trigonometric Functions Calculator.

Find All Six Trig Functions For The Angle Of A Right Triangle Youtube
Given a triangle you should be able to identify all 6 ratios for all the angles except the right angle.
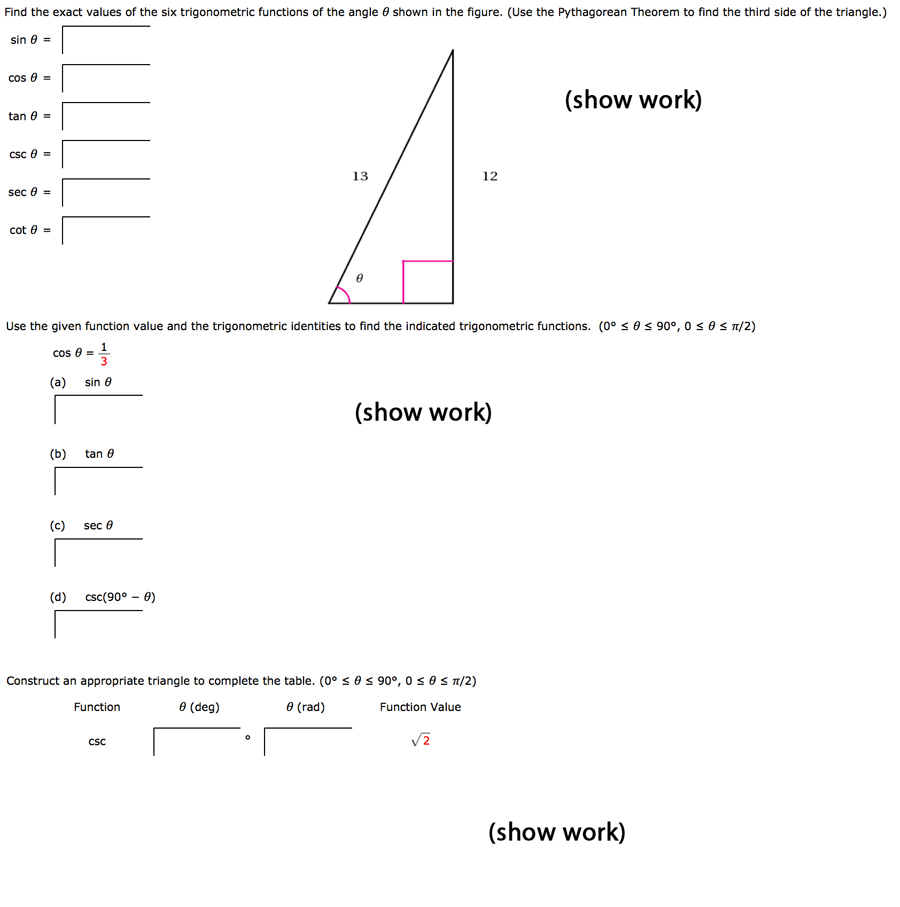
Find all six trig functions. If an answer is undefined enter UNDEFINED sinθ 3 4cosθ 0 sin. These problems deal with trigonometry in right triangles in Quadrant I. Home Embed All Precalculus Resources.
Consider the right triangle above. Sin x cos x tan x cot x sec x and csc x of a given angle. In most trig classes instructors tend to concentrate on doing everything in terms of degrees probably because its easier to visualize degrees.
Find 6 Trigonometric Functions For Each Angle. This problem has been solved. For each angle P or Q there are six functions each function is the ratio of two sides of the triangle.
It can be said that the ratios of the sides with respect to any of its acute angles represent the trigonometric ratio of that specific angle. Cosecant secant and cotangent. By using this website you agree to our Cookie Policy.
CREATE AN ACCOUNT Create Tests Flashcards. Sine sin cosine cos tangent tan cosecant csc secant sec and cotangent cot. It discusses how to evaluate trigonome.
If the point 8 1 lies on the terminal side of. The angle may be in degrees radians decimal form or radians in fractional form such as 2Pi5. Identities Proving Identities Trig Equations Trig Inequalities Evaluate Functions Simplify.
Solution for Find all six trigonometric functions for. Free trigonometric equation calculator - solve trigonometric equations step-by-step. The only difference between the six functions is which pair of sides we use.
Sinθ 1 Cosecθ Cosθ 1 Secθ Tanθ Sinθ Cosθ. 12 Diagnostic Tests. Learn how to find the six trigonometric functions given a point on the terminal side of the angle in standard position.
θ 3 4 cos. Sine cosine and tangent and their reciprocals. Six basic trigonometric functions of theta are as follows.
Remembering both the relationship between all six of the trig functions and their right triangle definitions will be useful in this course on occasion. All six functions have three-letter abbreviations shown in parentheses above. A Y B YA 240 270 Ax X R 1 R1 411 Sin 3 WI 41 CSC 3 31 2 31 CSC 2 411 COS 3 31 41 Sec 3 Cos 3 2 311 Sec 2 411 Tan 3 41 Cot 3 31 Tan 2 Зп Cot 2.
Find to the nearest degree. This online calculator calculates the six trigonometric functions. For any right triangle there are six trig ratios.
Use the given conditions to find the values of all six trigonometric functions. Find the value of any of the six trigonometric functions Study concepts example questions explanations for Precalculus. In pre-calculus you need to evaluate the six trig functions sine cosine tangent cosecant secant and cotangent for a single angle on the unit circle.
Definitions of the six functions. By Yang Kuang Elleyne Kase. Trig calculator finding sin cos tan cot sec csc.
This trigonometry video tutorial explains how to evaluate trigonometric functions given a point on the terminal side. Sine function of theta is represented by the ratio of opposite side of a triangle to the hypotenuse of the triangle. Choose the best answers.
Calculate the values for six possible trigonometric functions or ratios as sine cosine tangent cotangent secant and cosecant against selection using following formulas. You may want to draw a right triangle to examine these situations. To find the trigonometric functions of an angle enter the chosen angle in degrees or radians.
Underneath the calculator six most popular trig functions will appear - three basic ones. Show transcribed image text. Based on the value of the ratio of the sides in a right-angled triangle trigonometric ratios are defined as the values of all the trigonometric functions.
We go through 3 examples in this vid. This website uses cookies to ensure you get the best experience. For each angle on the unit circle three other angles have similar trig function values.
Click the Arrangement tab. Windows Central Select the Wireless.

How To Set Up Dual Monitors With Pictures Wikihow
Connect a video cable from your dock to the second monitor that have corresponding connections Figure 4.
Connecting a second monitor. Do not select the Mirror Displays tickbox unless you want the. Get the right cable. To connect a wireless display as a secondary screen to Windows 10 use these steps.
How to connect a second monitor to a laptop using HDMI HDMI which comes from High-Definition Multimedia Interface is a technology that allows electronic devices to transport both video and audio streams to compatible computer monitors TVs video projectors and other similar devices using dedicated cables. 3 Plug the. However if you want to use it as a second monitor for the a computer you will have to connect it to your computer with a VGA or HDMI cable and use the controls on your computer.
Search for the manual for example T480s manual on the web site to review the product user guide manual. Before changing settings for your external displays make sure everything is connected properly. Connecting the Second Monitor 1.
Use the following steps to connect to an external monitor. Connect the output port of the first monitor to the DisplayPort input port of the other monitor. Connect it to your PC or tablet and youve doubled your Windows desktop.
For example Displayport connections will. Place the second monitor. Connecting Monitors Using Different Kinds of Video Cables Note.
Match the shape of the other end of the video connection cable with the port on the TV and insert it. Youll see this. Desktop Your desktop computer must have at least two video ports in total one to connect the primary monitor and one to connect the second monitor.
Click on Bluetooth other devices. Connect the external monitor to the appropriate connector on the laptop such as an HDMI connector. Windows stretches your workspace across both computer screens.
Buy any cables or. Connect the other end of the cable to your monitor. Your second monitor should have at least one of the previously mentioned.
How to use multiple monitors in Windows 10 Video. Connect your monitor and PC using an HDMI cable use VGA and DVI on older computers. Go to Settings System Display Detect Identity to enable and configure the monitor.
Heres a video on the basics of connecting to an external monitor. Make sure that you get a monitor cable that matches the sockets on your laptop and monitor. Many laptops come with a port dedicated to connecting a second monitor built right in.
In some cases these may look like the typical ports youre used to such as HDMI but more often theyre. How to Add a Second Monitor to Your Computer 1 Obtain a new monitor thats compatible with your computer. Determine the connection needed for the second monitor.
Laptop If your laptop has at least one video output port you can use it to connect a second monitor. Follow the monitor manufacturers instructions to set both monitors to use DisplayPort 12 as an input source. When you connect an external monitor to a laptop computer you have to run a cable between the two devices.
On the back of your computers CPU box or monitor if youre using. If the monitor requires a different type of connection than is on your laptop youll need an adapter cable to connect to your monitor. 2 Push the plug on the end of your new or old second monitor cable into your computers video port on the back of your.
Figure 4 is an example of how the video cables should be arranged just match the type of connections from the dock to the monitors. How to connect an external monitor to a Mac. Identify which Apple adapter and cable you need to connect the Mac and the monitor by following the guidance below.
If only one of your monitors has an output port connect your Surface to that monitor first. Have you been blessed with an extra computer screen perhaps a leftover from a deceased PC. Determine your computers video connection type.
Tell your operating system youre using a second screen. If you want to extend your. The user guide lists the location and types of connectors that the laptop supports.
You can double your Windows 10 desktop space by adding a second monitor or other video device. Open System Preferences Displays. Check the second monitors connection type.
While Windows 10s settings allow for multiple displays not. Sometimes particularly on older or low spec machines youll be limited to one extra monitor but other newer ones will let you connect up to four. Most modern computers and monitors use either HDMI or.
Click the Add Bluetooth other devices button. Turn on the Bluetooth toggle switch if applicable. Make sure your computer can support a second monitor.
Alternatively you can use an old monitor from your old. Change your computer display settings to identify the TV as a second monitor and either duplicate or extend the displays. Under Display Multiple Displays choose how you want the second monitor to display.
If you are a crochet person you must know the happiness that it brings when you accomplish a project. To help you out more we have these 14 Crochet Gorgeous Ideas especially rounded up for the beginners.

How To Crochet Circles Part 2 Crochet Circle Pattern Crochet Circles Crochet Tutorial
If you need to start a project that requires you to start in a.
:max_bytes(150000):strip_icc()/CrochetCircle5-5c3bc4d4c9e77c00010affe9.jpg)
Crochet rounds for beginners. 7 hdc into your circle. 1 sc in each sc End the round with and ss in the last st cut the yarn and weave in any loose ends. This beginners project features a full video tutorials to take you through all the crochet technique needed in this project including.
To crochet more rows chain one stitch at the end of each of the end of your row and turn your crocheting over to start the next row. Check over the rug and weave in all loose ends removing any stitch. Use these general guidelines for the starting round.
Crochet projects dont have to be flat rectangles. Below you will find the complete pattern and instructional photos for two types of crochet scrunchies. Learn how to crochet today.
If you want to get stuck in straight away wed recommend a 4mm crochet hook and light coloured DK double knit acrylic yarn for beginners to start with but if you want to find out more heres our detailed guide on crochet kit for beginners. This tutorial will explain a very simple way to crochet in the round using the single crochet. Insert your hook into the top of ch 2 yo pull loop through st AND through the loop on your hook.
Chain 1 work 2 single crochets in every st around slip stitch to join16 sts. In each of the 6 loops created in Round 2. Crocheting the First Regular Round 1.
Most patterns marked Beginner or Easy will have specific and predictable pattern repeats or increases. This crochet project is quick and easy and beginner-friendly. To begin a crochet design that you work in rounds you first create a center ring and then crochet the first round.
Yarn over your hook again then pull. A detailed step-by-step tutorial on how to crochet a chain and a single crochet as well as make. Together we will look at what you need to get started and then over the four videos listed here you will begin to add new stitches and become familiar with crochet terminology which will enable you to follow simple patterns.
You will have 8 hdc total including the ch 2 Pull the tail to close the circle. Create your magic circle ch 2 the ch 2 counts as a hdc. Use eight to 12 stitches in round one for half double crochet.
Into Magic Ring ch3 counts as 1dc 11dc into Ring join with sl st to 3d ch of starting ch3. If you fancy tackling your first crochet accessory then this Chunky cowl crochet pattern by Martine DeRegt is a great pattern to crochet for beginners. Insert your hook through both strands of the first stitch you made in the last round.
Today Im showing you how to crochet for absolute beginners. Yarn over your hook and pull the loop through to the front. As its made in super-bulky yarn and with simple stitches it wont take you long to make even if youre still quite slow at crocheting.
1 sc in each of next 15 sc 2 sc in next sc rep from to. These crochet scrunchies will look great with a top knot bun ponytail or the end of a braid. Sl st to the top of the ch 2.
Like crochet butterflies tablecloth a tablecloth pattern for beginners round tablecloth pattern or a vintage one. This will be the first step in. Use 10 to 14 stitches in round one for double crochet.
Adding more rounds to your work is similar to adding rows. 9 Twisted ear warmer headband crochet pattern. How to Crochet in the Round Slip Stitching.
After you complete the number of stitches needed for the first round join the first and last stitches of the round to complete the circle. There are endless possibilities to perform with those crochet hooks so if you want to learn this art the time is right here. For instance a hat that starts out with 12 double crochet stitches will usually increase by 12 stitches in each increase round.
Chain 1 1 single crochet in the next st 2 single crochets in next st 8 times slip stitch to join24 sts. 1 sc in each of first 2 sc 2 sc in next sc. The number of stitches in your round has doubled one stitch added for every original stitch.
Ch4 sk next sp sc next sp ch3 5 times sl stitch to 2nd ch of starting ch4. How to make a Magic Circle How to work in the round How to work in the back loop only. Use six to 10 stitches in round one for single crochet.
You will also find all the materials stitches gauge and sizing information. Likewise a basket that starts out with 6 single crochet stitches should also increase by 6 each round. This versatile technique can be used to crochet simple items like coffee sleeves or hair scrunchies both are coming soon as well as more advanced projects like sweaters and sleeves.
Today well learn how to crochet in continuous rounds with an open center. All in simple ways and very low cost to add some more zest to your parties or even when the whole family gathers for a nice chat over dinner. The easy and simple crochet ideas would really help the crochet.
24sts 6 large loops Round 3. In this video series I take you through the very first steps in learning to crochet for ABSOLUTE BEGINNERS. Two loops should now be on the hook.
In everyday speech shoots are often synonymous with stems. The shoots are able to absorb nutrients via the plants different roots.
Untitled Document
Gibberellin function in plants.

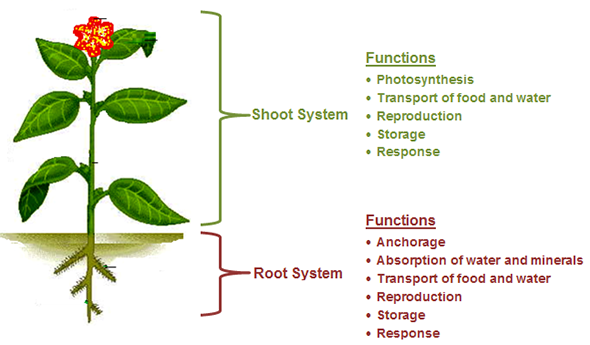
Function of shoots in plants. The shoot system of the angiosperms. Similarly it carries the food. While we may not think of plant reproduction as being the same as that of animals the basic function is surprisingly similar.
The shoot system and the root system. The plant body consists of two basic parts. Shoot system is the above ground part while root system is the below ground part.
They want to open a hotel for humans on their planet but they have a problem. Plant leaves and their functions The plant leaves are lateral outgrowth of the stem which develop from the meristematic tissues of buds. The problem is they have no idea what these plants need to grow.
Preventing soil erosion They help to bind the soil particles together thereby preventing them from being carried away by water or wind. What is the Shoot System of a Plant It holds leaves in position and helps them to spread out as the stem and its branches grow. Shoots are fresh growth in the plants structure.
The functions of the shoot system include. Therefore both parts work together for the survival of the plant. Characteristics of Shoot System Stem.
Shoots can be classified as vegetative or floral. A plant has different parts. Plant cells tissues and organs are adapted to their functions.
The stem root and leaves form an organ system that transports substances into around and out of a plant. Although they serve a number of important functions their primary role is to protect from a variety of harmful factors environmental stressors including microbes chemical compounds as well as ultraviolet light among others. Shoot system and root system are the two main structural parts of a plant.
The water and other nutrients that are taken in are shuttled up through the plants vascular system located in the shoot. The shoot is the production center for a plant. The leaves are the main.
The shoots are the part of the plant above the ground while the roots are those parts of the plant that are below the ground. It bears flowers buds leaves and fruits. The most important differences between auxin and gibberellin are that auxin promotes the growth of shoot whereas gibberellin is involved in the elongation of the stem flowering and seed germination.
This ensures that they get. Plants have two main parts- the roots and the shoots. It conducts water and mineral salts from the roots to the leaves.
The Function of the Shoot System The shoot system works closely in part to the root system of the plant. These are the flattened structures that hit the node of the main stem and the region in the middle of two nodes. Therefore the shoot system is functionally responsible for food production photosynthesis and reproduction.
The shoot system includes organs such as leaves buds stems flowers and fruits and usually it develops above ground. It functions as a skeleton by constituting a major part of the shoot system and firmly supports the other. First somewhat obviously roots firmly anchor the plant to a fixed.
Epidermal cells include several types of cells that make up the epidermis of plants. The important gibberellins function are mentioned below. In this Year 3 Science Block the alien beings on Planet Dock 5 need your help.
The latest development emerging from seed germination that will grow uphill is a shoot wherein the leaves will be able to expand. Flowers also known as a bloom or blossom are the reproductive part of a specific group of plantsFlowers are such a important aspect of plant life that those with them are called floral plants. Moreover shoot system is responsible for the food production by photosynthesis while root system is responsible for water and mineral absorption from the soil.
Stems are sturdy structures that grow in order to give a plant a fighting chance. They are the part of the plant shoot which serves as the chief food-producing organ in most vascular plants. Its too far away to have deliveries of fresh food from Earth so they need to build a space farm for Earth food plants.
In the spring perennial plant shoots are the new growth that grows from the ground in herbaceous plants or the new stem or flower growth that grows on woody plants. Roots are branched underground structures that serve two major functions. Stems which are an integral component of shoots provide an axis for buds fruits and leaves.
The Function of the Shoot System The shoot system works closely in part to the root system of the plant. It is the organ system that gives rise to stems leaves and flowers. Here we will go into the depth of roots ad understand their functions structure types and modifications.
The shoots are able to absorb nutrients via the plants different roots. This includes the stem leaves and flowering stem with flower buds. Roots Shoots Stems and Leaves.
Absorption of water and nutrients from the soil They help plants to absorb water and nutrients from the soil which are essential for their survival.
A calculation used in activity-based costing for determining the costs associated with activities based on particular time-based processes. Divide net sales by gross sales.

Image Result For Cost Volume Profit Analysis Formulas Cost Accounting Fixed Cost College Survival
10 Average fixed cost 3 Average variable cost x 1000 Units 13000 Total cost.

Formulas of cost accounting. Beginning inventory value Purchases of inventory Ending inventory value Cost of goods sold. B Cost accounting is a science and arts both. To reduce and eliminate costs in a business you need to know the formulas that are most often used in cost accounting.
Financial Accounting Cost Accounting and Management Accounting 1 - 22 Study Note 2 Material Control 23-48 Study Note 3 Labor Cost Computation and Control 49-88 Study Note 4 Overheads 89-118 Study Note 5 Methods of Costing-Job Batch and Contract Costing 119-146 Study Note 6. Conversion Cost Direct material Factory overhead. The result should be close to 1.
Materials price usage variance Actual quantity used Actual price Actual quantity used Standard price materials quantity usage variance formula. The first function is to control the cost within the budgetary constraints management has set for a particular product or serviceIt is essential since management allocates limited resources to specific projects or production processes. By the number of goods produced.
Cost pool total Cost driver The result will be a dollar amount that can then be multiplied by the number of products manufactured to obtain a total product cost for that cost pool. Subtract the cost of goods and services from net sales. When you understand and use these foundational formulas youll be able to analyze a products price and increase profits.
Cost Accounting Formulas And Terminologies 1. At the 1000-unit production level the total cost of the production is. Economic costs represent any what-if scenarios.
You multiply your sales per unit by units sold. Financial accounting is primarily concerned with record keeping directed towards the preparation of Profit and Loss Account and Balance Sheet. Materials purchase price variance Formula.
Prime Cost Direct Material Direct Labor2. The breakeven point is the level of sales where your profit is zero. The result as a percentage of net sales should be.
When you subtract your fixed costs from contribution margin the amount left over is your profit. The formula for total cost can be derived by adding the total fixed cost to the total variable cost. It consist its own principles concepts and conventions which may vary from industry to industry.
The breakeven formula is sales minus variable cost minus fixed cost. Accounting 303 covers many aspects of cost accounting so this is a formula sheet with the information in one place for ratios and calculations. Cost accounting formulas Net sales percentage.
An important part of standard cost accounting is a variance analysis which breaks down the variation between actual cost and standard costs into various components volume variation material cost variation labor cost variation etc so managers can understand why costs were different from what was planned and take appropriate action to correct the situation. Mathematically it is represented as Total Cost Total Fixed Cost Total Variable Cost. Example of the Total Cost Formula A company is incurring 10000 of fixed costs to produce 1000 units for an average fixed cost per unit of 10 and its variable cost per unit is 3.
It is the source of all other functions of cost accounting as we can calculate the cost of sales per unit for a particular product. If not the company is losing an. Beginning balance net income net losses dividends ending balance.
Breakeven Formula Profit 0 sales variable costs fixed costs Target Net. It provides information regarding the. You can calculate accounting cost by subtracting your expenses from your revenue.
Cost accounting is a practice of cost control which is as follows-a Cost accounting is a branch of systematic knowledge that is a discipline by itself. The above mentioned is the concept that is elucidated in detail about Accounting Formulas for the Commerce students. Cost Accounting is a branch of accounting and has been developed due to limitations of financial accounting.
Factory cost Direct material Direct labour Factory overhead. Sales Cost of goods sold Gross profit. You can print it out and use it on the proctored.
The following formulas can be used to find out different costs. Materials purchase price variance Actual quantity purchased Actual price Actual quantity purchased Standard price Materials price usage variance formula. Prime cost Direct material consumed Direct labour.
Accounting costs represent anything your business has paid for.
When you knit every round on circular needles it gives you stockinette stitch. Knit in the round on circular needles itâs perfect for an on trend accessory in a hurry.
19 Easy Hat Knitting Patterns Allfreeknitting Com
Work in stockinette stitch for 5 inches.

Easy knit hat pattern circular needles. Repeat from to end of round. The benefit to using circular needles is that there is usually no seaming involved but unfortunately youll almost always have to use double-pointed needles near the end of the pattern to accommodate for the small circumference of the hat as you begin to decrease near the top. The gauge for this project is 12 rows and 12 stitches equals 4 inches in stockinette stitch.
Materials 2 x Merino Xtra 504 or color of your choice 16 Circular knitting needles. Join to work in the round being careful not to twist the. An Easy Level Knitting Pattern This is an easy pattern for those of you who are advanced beginner level and the techniques you will need to know are knit purl k2tog and knitting in the round.
The Hillock hat is a fitted textured beanie that features Double Moss stitch. Repeat from to end of round. The ribbing is done on the smaller needles then you change over to the 45mm ones.
Heres a free knit hat pattern from Berroco that creates so much texture using a broken rib stitch. K3 p3 12 times. This part of the hat is the easy bit take a look at the pattern below.
Knit to 2 stitches before the marker k2tog. Whether youre a beginning knitter or a pro youre going to love how easily this stylish cap knits up in no time. With over a thousand free hat knitting patterns you can knit one in every style from basic beanies to simple bobbles complex cable knits to fancy fisherman easy preemie hats right through to advanced adult designs by independent designers and your favorite brands including Rowan and Cascade.
We have some super cute bobble hat knitting patterns or maybe youre after a beautiful knitting pattern for baby hatsDiscover hat patterns for all yarn weights - whether its a quick chunky knit or a double knit hat pattern free to download. K1 P1 rep till end To knit hat. Using 16-inch circular needle cast on 72 sts.
Combine that with some bulky weight wool and youll have yourself one handsome hat before you know it. Its an easy 4-row repeat pattern and the hat knits up pretty quickly. US Size 3 and 5 Double pointed knitting needles.
This pattern is for an adult hat of average size with a brim of 60 stitches. The stitches form a pattern in the hat that gives. Youll need to be comfortable with DPN knitting or two circular knitting needles.
This hat is knitted from the bottom-up in the round on circular needles so it has no seams. Knit 1 round placing a marker after each set of stitches as indicated in the following table. This pattern uses only knits and purls if youre feelin saucy on a pair of 16 circular needles.
Youll love how much texture this hat has. There are so many free knitted hat patterns to search through. Its up to your personal preference really.
Transfer stitches onto size 8 5mm circular needles to knit the remainder of the hat. If you want a smaller or larger beanie just determine the number of stitches you need for the brim and adjust the numbers in the pattern accordingly. Work in 3x3 rib pattern until brim measures 3 inches.
If youre ready to tackle the circular knitting needles these easy hat knitting patterns are for you. Shape the top of the hat top shaping Setup roundDecrease the number of stitches on your needles to the nearest multiple of 8 by working the number of. Knitting in the round has no wrong side rows so there is no purling involved.
16 Free Knit Hat Patterns on Circular Needles The Seed Stitch Knit Hat. On 5 needles 1 x 1 Ribbing Every row. This knitted hat pattern is perfect if you are in love with the bubble stitch pattern and are.
Its a simple knit hat pattern using circular needles. Lisa If you are having a size issue the problem is your gauge not the patternThe gauge is 7 stitches to 4 with a 57 stitch cast on in gauge makes a 32-33 wide blanket 57 divided by 7 814 x 4 3257. The pattern is easily adjustable to fit smaller or larger sizes.
With 3 circular needles cast on 100 108 stitches. Easy Peasy Bulky Hat Free Knitting Pattern You only need one ball of this soft plush chenille yarn to make a warm comfy hat. Using mainly knit and purl stitches it will also introduce you to decreasing and shaping.
US Size 5 Gauge Approx 6 st 1 in Stockinette St. Personally I dont like a beanie hat to be too tight so I would knit this all in the 45mm needles. This yarn blooms slightly when knit so it will relax a bit after it is knit and be slightly bigger than the pattern specifies if you obtain gauge.
One 40cm 16in 4mm circular needle and another of 40cm 16in 45mm thickness. Knit Repeat round 7 knit every round until the work measures 8 from the cast on edge. Free Hat Knitting Patterns.
In this case the pattern recommends you cast on with double pointed needles DPNs.
Performing a Quick Factory Reset 1. If your tablet is working properly you should be able to manually navigate to the option.

The Definitive Guide To Reset Nook
PWR off the Nook Tablet.

Factory reset nook tablet. 3 Turn the tablet back on. Not all Android tablets are the same. Wait about 10 to 15 seconds.
4 Release the buttons. PWR off the Nook Tablet. How to Access the Factory Reset Screen in a Nook Tablet 1 Reset to Original Firmware.
Power off your Nook tablet. This is an option that saves you the time of tapping through various screens and. The reset is now complete.
In the quick nav bar tap the Settings icon. If you really really want to do this go to Step 7. Press the Power button for about 3 to 5 seconds until the screen turns off.
Hold the Power button and the Home button n simultaneously. Click on the device information option. Turn the tablet back on and then immediately press and hold down the power button and the.
You can only deregister and reset your Nook over an Internet connection. Turn off your Nook tablet. This is also known as a factory reset.
Resetting Your Nook Simple Touch Nook Colour or Nook Tablet 1. Erasing deregistering and resetting deletes all files transferred from your computer. Hold PWR VOL VOL- buttons simultaneously to reboot.
Factory Reset Using the Tablet Settings Every Android device should have a Factory reset option in the Settings app. Press the Power button to turn your NOOK back on. Answers others found helpful NOOK Tablet 7 - Unresponsive Device.
Hold PWR VOL VOL- buttons simultaneously to reboot. Perform Factory Reset of the Nook Tablet. Backup any files on your Nook.
In the Device Settings section tap Device Info. Tap Erase Deregister Device. An Erase and Deregister reboots your device and deletes all of your personal data restoring the device to the state it was in when it left the factory.
The final click on the reset Nook will start the hard reset process and in a few minutes your Nook HD will be as it was at the time of purchasing. Together these buttons will start to reboot your. Press and hold the power button then press and hold the Home n key while still holding the power button down.
Doing a factory reset deletes all the files and settings saved on your device so make sure you create a backup first. Again click on the erase and deregister option and then choose reset Nook. 2 Turn off your Nook tablet.
NOOK Tablet 7 16GB Reset Button If the tablet is not responding to button presses or screen touches you can quickly restart the tablet by using a pin or paperclip to press the recessed reset button located on the top of the tablet adjacent to the headphone jack. Release the Power and Home. Dcnarads post here is a bit haphazard and it slightly missed the mark as to how this actually needs to be performed so as to get to the factory reset screen properly.
Make sure you are connected to Wi-Fi. 2 Power down your Nook Color to begin the reset process. External Factory Reset 1 Press and hold the power button for 20 seconds to turn off the Nook tablet.
Dcnarads post here is a bit haphazard and it slightly missed the mark as to how this actually needs to be performed so as to get to the factory reset screen properly. To reset your NOOK. Press and hold the power button for 20 seconds to turn off the Nook tablet.
A hard reset of your tablet is drastic Press the button to display the quick nav bar. How to hard reset a BARNES NOBLE password locked Nook Color If you have locked your Nook Color and cant remember the password this video will show you hav. Wait about 10 to 15 seconds.
Then choose the erase and deregister option. Perform Factory Reset of the Nook Tablet. If you have locked your Nook HD and cant remember the passwo.
From the Home screen tap App Drawer Settings System.
The collision between subatomic particles is generally elastic. Elastic means that no energy is converted into heat during the collision so kinetic energy before and after the collision remains constant.

Elastic And Inelastic Collision By Armaan Singh
Please illustrate collisions with billiard balls.
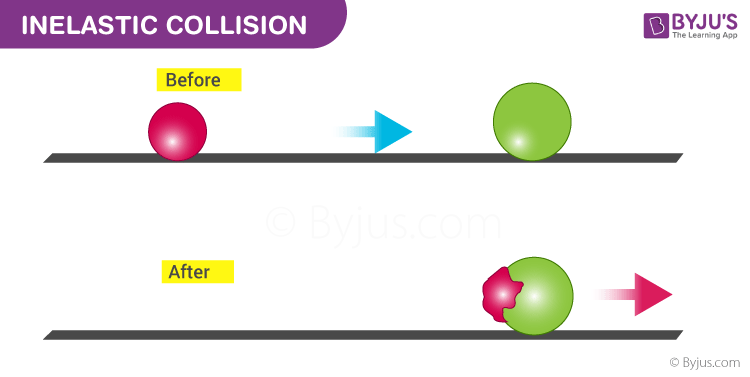
Elastic and inelastic collisions. An inelastic collision is one in which part of the kinetic energy is changed to some other form of energy in the collision. 4 comments 5 votes. Elastic Collisions It.
The elasticity of a collision is dependant on the speed of the collision the angle of incidence and the material the objects are made of. In this type of collision colliding objects are deformed and heat is generated. On a billiard board a ball with velocity v collides with another ball at rest.
If youre seeing this message it means were having trouble loading external resources on our website. And an Inelastic Collision is a collision in which momentum is conserved but the total kinetic energy of the system is not the same before and after the collision. The collision between two steel or glass balls is nearly elastic.
Any macroscopic collision between objects will convert some of the kinetic energy into internal energy and other forms of energy so no large scale impacts are perfectly elastic. Elastic collisions are not common and they are never observed at macroscopic scales. In both elastic and inelastic collisions momentum is always conserved.
Then we listed the two types of collisions. Difference Between Elastic and Inelastic Collision Kinetic Energy Conservation. A perfectly elastic collision is defined as one in which there is no loss of kinetic energy in the collision.
In Inelastic collisions the total kinetic. In an inelastic collision kinetic energy is dispersed in the form of heat sound or deformation. An Elastic Collision is one in which both the kinetic energy and momentum of the system are conserved.
What is a Collision. Interactions between molecules are examples of perfectly elastic collisions. The type of collision in which both the momentum and kinetic energy of the system are conserved is called elastic collision.
In elastic collisions the forces involving are conservative in nature. If someone else used the computer for this lab before you click New ExperimentThis will ensure that you have your own unique cart data when you do the experiment. Elastic and Inelastic Collisions.
When they dont the collision is inelastic. In inelastic collision the momentum and total kinetic energy before and after collision is not same. In this section we will dive in and take a closer look at inelastic collisions.
If kinetic energy before is the same as after then the collision is elastic. When you take a shot on a pool table or tackle someone in a football game youre participating in a collision. We defined and discovered more about elastic collisions.
Inelastic collision is a kind of collision whereby the two colliding objects stick together and move with the same post-collision speed. Elastic is a bouncy material so when objects bounce off one another in the collision and separate it is an elastic collision. Three Types Of Collisions Complete Inelastic Collision It includes objects which will stick together afterward.
Elastic collisions conserve kinetic energy. Partially Inelastic Collision It involves objects which cut apart after their collision but deformations appear in. In reality elastic collisions do not exist except between subatomic particles.
Learn about whats conserved and not conserved during elastic and inelastic collisions. Kinetic energy conservation has. Their velocities are exchanged as it is an elastic collision.
This is an inelastic collision. An elastic collision between two objects is one in which total kinetic energy as well as total momentum is the same before and after the collision. Define and compare the inelastic collisions and elastic collisions in one-dimensional space.
Heres a trick for remembering which collisions are elastic and which are inelastic. The basic difference between elastic and inelastic collisions is as follows. In the last section we talked about what momentum was.
Basically there are two main types of collision elastic collision and inelastic collision. Collisions can be elastic or inelastic. 1 Name _____ Date _____ Period _____ Elastic and Inelastic Collisions Find the Lab In your web browser go to then go to Virtual Labs and then click Conservation of Momentum.
In both an elastic and inelastic collision momentum is conserved however in an elastic collision the total kinetic energy is the same before and after the collision. But the two events we just mentioned are tota. The basic difference between elastic and inelastic collision is that inelastic collision kinetic energy is conserved while in inelastic collision kinetic energy is not conserved.
The chloroplastsof red algae green algae and plants evolved from an endosymbiotic cyanobacteriumliving within a mitochondria-containing eukaryotic host cell. All eukaryotic cells like your own are creatures that are made up of the parts of other creatures.

From Prokaryotes To Eukaryotes
For this discussion describe the theory of endosymbiosis in your own words and identify and discuss one line the evidence for this theory.

Describe the theory of endosymbiosis. Describe the endosymbiosis or endosymbiosis theory in general terms. In the Endosymbiotic theory the idea is that a eukaryotic mitochondrion evolved from an autotrophic bacterium that had been engulfed by the eukaryotic cell. This eukaryotic cell originated when an anaerobic prokaryote not able to utilize oxygen for energy lost its cell wall.
Endosymbiosis Now that we know about both prokaryotic and eukaryotic cells lets look at the endosymbiosis theory. The hypothesized process by which prokaryotes gave rise to the first eukaryotic cells is known as endosymbiosis and certainly ranks among the most important evolutionary events. For full credit post unique thoughts compared to other classmate submissions on the evidence for the theory of.
So in accordance with the endosymbiotic theory every eukaryotic cell that we see today is actually composed of a number of other cells which were once whole in themselves. The bacteria travels to the intestine where it is endocytosed by an. Even though the individual single-celled organisms remained separate and could survive.
The prokaryotes may initially have been parasites or even an intended meal for the larger cell somehow escaping digestion. Mitochondria and chloroplasts divide separately from. This cell was able to arise when an anaerobic prokaryote lost its cell wall because it was unable to use oxygen for energy.
Some people refute the theory that similar DNA is due to common descent a cornerstone of endosymbiotic theory. The endosymbiont theory argues that the eukaryotic mitochodria evolved from a tiny autotrophic bacterium that was ingested by a bigger primitive heterotrophic eukaryotic cell. The endosymbiotic theory states that some of the organelles in eukaryotic cells were once prokaryotic microbes.
Mitochondria and chloroplasts have their own DNA which is circular not linear. Whats more the evidence for endosymbiosis applies not only to mitochondria but to other cellular organelles as well. Endosymbiosis is a relationship where one organism lives inside the other and both are benefited.
An endosymbiont is one organism that lives inside of another one. Endosymbiosis is the best explanation for the evolution of the eukaryotic cell. Endosymbiotic theory proposes that these organelles were once prokaryotic cells living inside larger host cells.
How Eukaryotic Cells Evolve Endosymbiotic Theory History. You can use your textbook as a reference and research this theory online as well. This theory suggests that mitochondria and plastids in eukaryotic cells were once.
A bacterial cell is ingested by a human. Mitochondria the important energy generators of our cells evolved from free-living cells. Mitochondria and chloroplasts have their own ribosomes which have 30S and 50S subunits not 40S and 60S.
Based on decades of accumulated evidence the scientific community supports Marguliss ideas. Genome fusion by endosymbiosis between two species one an Archaea and the other a Bacteria has been proposed as responsible for the evolution of the first eukaryotic cells. The theory of endosymbiosis Respond to the following posts The theory is that eukaryotic cells derived from interactions between various entities including spirochaetes.
Endosymbiosis is the process in which one organism lives within the other and the endosymbiont is the organism that lives within the other organism. The theory that explains how this could have happened is called endosymbiotic theory. The endosymbiosis theory postulates that The mitochondriaof eukaryotesevolved from an aerobic bacterium probably related to the rickettsias living within an archaeal host cell.
First proposed by Boston University biologist Lynn Margulis in the late 1960s the. Symbiogenesis or endosymbiotic theory is the leading evolutionary theory of the origin of eukaryotic cells from prokaryotic organisms. Symbiosis is a relationship in which organisms from two separate species live in a close dependent relationship.
Endosymbiosis endo - within is a specific type of symbiosis where one organism lives inside the other. It is thought that ancestral eukaryotic cells consumed aerobic bacteria and photosynthetic bacteria leading them to evolve into mitochondria and chloroplast respectively. Strong evidence points to endosymbiosis as the answer to the puzzle.
Mitochondria and chloroplasts are the same size as prokaryotic cells and divide by binary fission.
The number of sides of the polygon. The formula for calculating the size of an interior angle is.
Q28 Answers Paper 1 November 18 Edexcel Gcse Maths Foundation Elevise
To find the value of a given exterior angle of a regular polygon simply divide 360 by the number of sides or angles that the polygon has.
Each exterior angle of a regular polygon. Check here for more practice. A Calculate the size of each interior angle in the regular polygon. The sum of the measures of the interior angles of a polygon with n sides is n 2180.
Each exterior angle must be 360n where n is the number of sides Press play button to see. All the Exterior Angles of a polygon add up to 360 so. The other side ac is split into lengths of x and x 12.
1 Show answers Another question on Mathematics. The measure of maximum possible exterior angle in a regular polygon is. The answer is 180 72 108.
What is the length of ac. An exterior angle basically is formed by the intersection of any of the sides of a polygon and extension of the adjacent side of the chosen side. The sum of the measures of the exterior angles of a polygon one at each vertex is 360.
Correct answer to the question if a regular polygon has exterior angles that measure 40 degrees each how many sides does the polygon have. The measure of each interior anglec. Find the measure of each exterior angle of regular polygons with sides 4 0.
Interior angle of a polygon sum of interior angles number of sides. Measure of a Single Exterior Angle Formula to find 1 angle of a regular convex polygon of n sides 1 2 3 360. The measure of each exterior angleb.
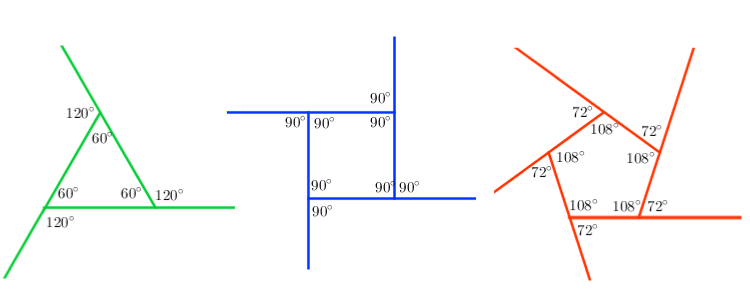
Ex 32 5 a Is it possible to have a regular polygon with measure of each exterior angle as 22Given that Exterior angle 22 Let number of sides n In a regular Polygon Sum of the exterior angles 360 22 n 360 n 360 22 n 1636 Since n cannot be in decimals 22 external angle is not possible Ex 32 5 b Can it be an interior angle of a regular polygon. All the interior angles in a regular polygon are equal. To find the sum of its interior angles substitute n 5 into the formula 180n 2 and get 1805 2 1803 540 Since the pentagon is a regular pentagon the measure of each interior angle will be the same.
Which is the same as the number of sides. Measures of Exterior Angles They are formed on the outer part that is the exterior of the angle. Find the number of sides of a regular polygon if each exterior angle measures.
Aline parallel to a triangles side splits ab into lengths of x - 5 and x 2. We do this by subtracting the exterior angle of 72 from 180. Solution for Find the measure of each exterior angle of a regular polygon whose central angle measures a 45.
The sum of the exterior angles of a polygon is 360. The ratio between the exterior and interior angle of a regular polygon is 15 finda. To find the size of each angle divide the sum 540º by the number of angles in the pentagon.
The sum of the measures of the exterior angles of a convex polygon one angle at each vertex is 360 The measure of each exterior angle of a regular n-gon is 360 n. How many sides does a regular polygon have if each exterior angle has a measure of 15. 360 div number of sides.
Interior and exterior angles formed within a pair of adjacent sides form a complete 180 degrees angle. The sum of the exterior angles of a regular polygon will always equal 360 degrees. 540 5 108 There are 108 in each interior angle of a regular pentagon.
For example an eight-sided regular polygon an octagon has exterior angles that are 45 degrees each because 3608 45. The measure of each interior angle of an equiangular n -gon is If you count one exterior angle at each vertex the sum of the measures of the exterior angles of a polygon is always 360. Correct answer to the question.
The formula for calculating the size of an exterior angle in a regular polygon is. A regular polygon has equal exterior angles of 72.
So if the ottoman top measures 14 square you need to cut 1 piece of fabric thats 14 ¾ square. Instructions for Making the Slipcover 1.

Diy Cube Ottoman Slipcover Diy Ottoman Diy Cube Storage Ottoman Slipcover
Iron all your fabric well so its flat and smooth when youre ready to cut it.

Directions for making an ottoman slipcover. Measure the distance from the top edge of the ottoman to the floor. If your ottoman is rectangular make sure to pin one shorter piece with one longer piece rather than matching up the two equal pieces. Set the fabric with the outside facing.
Use a measuring tape to measure your ottoman from the floor up one side across the top and down the other side to the floor. And closely spaced button-tufting. Stitch two pieces together using a 12 seam allowance.
Cut a strip of the loop side of the velcro the length of each side of your ottoman and attach it using hot glue. To each side piece. 3 Sew the piping around the perimeter of the top piece.
I love how Diane covered just the cushion part of her ottomans and left the rattan based exposed. Measure the ottoman from edge to edge and note the size of the top and sides. Cut section of fabric large enough to cover top of ottoman leaving about an extra inch on each side as a.
Next I cut the excess fabric all around the bottom allowing 1-2 inches extra length for wrapping under the bottom later. Set your ottoman on top of the. Pom-Pom Ottoman Slipcovers In My Own Style.
For example my storage cube measured 15 inches up one side 14 inches across the top and 15 inches back down the other side totaling 44 inches. Add 1 inch for your hem allowance. How to Make an Ottoman Slip Cover.
Its a great opportunity to. Slip the cover over the ottoman. Cut Fabric for Ottoman Side.
Ottoman toppers with giant pom-poms. Watch More Videos From Cooking Fundamentals. 4 Pin then sew the 4 side fabric pieces to the top.
No need to throw it away and buy a new one. Using sharp scissors clip through the fabric and tape at each edge of foot mark. Add ¾ to the width and 1 ½ to the length.
How to Slipcover an Ottoman Cut Top Piece. Right sides together pin two side pieces together along their sides. Place marks on the base fabric indicating the edges of the feet.
Add this measurement at a right angle to the long side of the rectangle shape. Iron lightweight interfacing to the back of the fabric if your fabric is thin. How to Season with Salt.
Cutting the Top Panel 1. Try this easy ottoman project to upgrade an older ottoman. Add 1 inch to the width to allow for a 12-inch seam allowance the entire way around the circle.
Using your straight pins pin the sides together at each corner to create four. Choose a heavy-duty fabric for your cover. If not jump to step 3.
The waterfall-style ottoman with a semi-attached cushion most closely matches its mate. I think its the most simple design you can make. Lay the fabric evenly over the ottoman with the right side facing down.
This is the short side of your rectangle shape. 2 Pin the finished piping around the perimeter of the top piece. Attach velcro to the ottoman.
Measure the width of the ottomans top with a fabric tape measure. Martha Stewart offers tips on how you can easily make a decorative ottoman slip cover. You can use just about any type of fabric you want for this but home.
My first step when making these ottoman slipcovers is to place the fabric over the stool right-side-down. The decorative details include a double row of studded nail heads. Sep 12 2016 - Many people have an old ottoman sitting around in their den or living room for its great function but often that same boring ottoman wouldnt win a design award.
She shares her step-by-step instructions on her bog. If possible center a main design or motif for a more professional finish. Add ¾ to the height and width.
With right sides together match each side of the skirt to the side of the ottoman top placing a seam at each pin mark. Turn and press seams down. This is what the bottom of my ottoman looks like when Im done.
When making your slipcover follow these simple steps. Attach the finished skirtaccent panel to the top piece On the ottoman top panel piece 31¼ x 25¾ in our sample measure ½ in from each side of each corner and mark with a. The others have stiff tops to stand in for a low table.
A full tightly gathered skirt accented with a second narrower ribbon. 1 If you are using bias welting trim make that first. To the top piece.
If you are interested in making your own I would suggest that you watch the Extended Version of. Once the hot glue has dried completely put your slip cover on and fold each panel under and join the velcro. This video is an overview of making your own ottoman cover.
To determine how much cotton cording is needed for this project measure circumference of ottoman then.
Here are 45 lessons on the basics and extra resources to keep you going. While this version features an older Dummies cover and design the content is the same as the new release and should not be considered a different product.
Beginning Programming For Dummies Cheat Sheet Dummies
Forgetting to have a.
Computer coding for dummies. Code examples contained in this book can be downloaded freely from wwwpb-beginnerscouk ISBN 1-4276-0428-2 1972006. Dummies has always stood for taking on complex concepts and making them easy to understand. There is a list of tutorials suitable for experienced programmers on the BeginnersGuideTutorials page.
Welcome to Code Conquest a free online guide to coding for beginners. Plus youll be pleased to learn that you dont need to spend. Coding For Dummies 9781119293323 was previously published as Coding For Dummies 9781118951309.
The easy way to learn programming fundamentals with Python Python is a remarkably powerful and dynamic programming language thats used in a wide variety of application domains. Plus Python features full. If youve been looking to learn how to code we can help you get started.
Coding All-in-One For Dummies gives you an ideal place to start when youre ready to add this valuable asset to your professional repertoire. Getting Started with Coding Career Building with Coding Basic Web Coding Advanced Web Coding Creating Web Applications Selecting Data Analysis Tools. People who rely on dummies rely on it to learn the critical skills and relevant information necessary for.
Whether its to pass that big test qualify for that big promotion or even master that cooking technique. Not having a closing HTML tag after every opening HTML tag. Before getting started you may want to find out which IDEs and text editors are tailored to make Python editing easy browse the list of introductory books or look at code samples that you might find helpful.
It doesnt matter if youve dabbled in coding or never written a line of code this book guides you through the basics. A Beginners Guide To Computer Programming Updated for Purebasic v4 Gary Willoughby. Missing curly braces in JavaScript especially for if statements.
Missing curly braces colons or semicolons in CSS as in the following. No coding experience is required for Coding For Dummies your one-stop guide to building a foundation of knowledge in writing computer code for web application and software development. Whether you need to learn how coding works to build a web page or an application or see how coding drives the data revolution this resource introduces the languages and processes youll need to know.
This site has all the step-by-step information you need to get started. Purebasic Gary Willoughby A Beginners Guide To Computer Programming. Missing brackets or in HTML.
Coding All-in-One For Dummies PDF gives you an ideal place to start when youre ready to add this valuable asset to your professional repertoire. Dummies has always stood for taking on complex concepts and making them easy to understand. Coding All-in-One For Dummies gives you an ideal place to start when youre ready to add this valuable asset to your professional repertoire.
The main chapters books are. See all the things coding can accomplish. The demand for people with coding know-how exceeds the number of people who understand the languages that power technology.
Coding All-in-One For Dummies For Dummies Computers Paperback 20 Jun 2017 The book. While this version features a new Dummies cover and design the content is the same as the prior release and should not be considered a new or updated product. Dummies has always stood for taking on complex concepts and making them easy to understand.
Hands-on exercises help you learn to code like a pro. Using foundational web development languages like HTML CSS and JavaScript it explains in plain English how coding works and why its needed. Whether its to pass that big test qualify for that big promotion or even master that cooking technique.
If youre someone who wants to learn about coding but you havent got a clue where to start youve come to the right place. The demand for people with coding know-how exceeds the number of people who understand the languages that power technology. Dummies helps everyone be more knowledgeable and confident in applying what they know.
While this version features a new Dummies cover and design the content is the same as the prior release and should not be considered a new or updated product. This is a large book combining 9 books in total on coding. QA766G575 2003 0051 dc22 2003020686 British Library Cataloguing in Publication Data A catalogue record for this book is available from the British Library ISBN 0-470-86398-6 Typeset in 1011pt Joanna by Laserwords Private Limited Chennai India.
There is also a list of resources in other languages which might be. Coding For Dummies 9781118951309 is now being published as Coding For Dummies 9781119293323. Whether you need to learn how coding works to build a web page or an application or see how coding drives the data revolution this resource introduces the languages and processes youll need to know.
Dummies helps everyone be more knowledgeable and confident in applying what they know. Hands-on exercises help you learn to code like a pro. Dummies helps everyone be more knowledgeable and confident in applying what they know.
Coding For Dummies 9781119293323 was previously published as Coding For Dummies 9781118951309. People who rely on dummies rely on it to learn the critical skills and relevant information necessary for. Whether you need to learn how coding works to build a web page or an application or see how coding drives the data revolution this resource introduces the languages and processes youll.
Choose a programming language. People who rely on dummies rely on it to learn the critical skills and relevant information necessary for. Whether its to pass that big test qualify for that big promotion or even master that cooking technique.
These instructions can be written in several different languages or which are simply different ways of organizing the instructions and text. Some of its key distinguishing features include a very clear readable syntax strong introspection capabilities intuitive object orientation and natural expression of procedural code. Computer programming is done as essentially a set of written instructions that the computer follows also known as binary coding.
On the Insert tab in the Charts group click the Statistic Chart symbol. You dont have to sort the data points from smallest to largest but it.
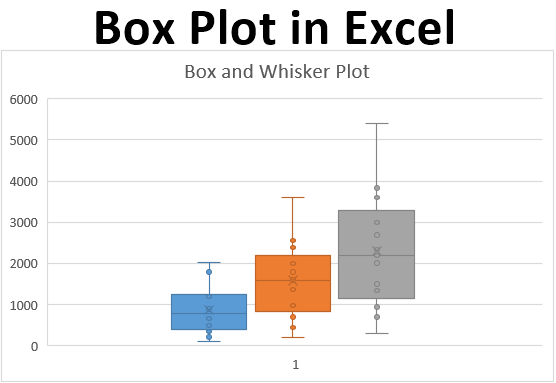
Box Plot In Excel Examples On How To Create Box Plot In Excel
Click on the down arrow and select Box and whisker plot.

Create box and whisker plot excel. Next you navigate to Insert and then to Insert Statistic Chart. For this create a table like shown below. Step 1 Select the data obtained as the third table in the previous section.
Step 3 Click the DESIGN tab on the Ribbon. This chart is used to show a five-number summary of the data. Create box and whisker chart in Excel 2013 and earlier versions Step1.
Now you have your Box and Whisker Chart. These five-number summary are Minimum Value First Quartile Value Median Value Third Quartile Value and Maximum Value. To create the box plot you select all observations including the titles.
You can make and personalize your personalized evaluation in minutes when you make use of an box and whisker plot excel template. Making Use Of box and whisker plot excel template for Excel worksheets can help boost performance in your service. It indicates how the values in the dataset are spread out.
On the Insert tab go to the Charts group and click the Statistic Chart symbol. Minimum Maximum First Quartile Second Quartile Median Third Quartile. Simple Box and Whisker Plot 1.
In the past creating one came with a price it was tedious. To create Box and Whisker Plot in Excel first we need to calculate the five statistical numbers from the available data set. Prepare the data range to create box and whisker chart based on.
To see the actual values that are summarized in the box plot click on the plot. A box plot in excel is a pictorial representation or a chart that is used to represent the distribution of numbers in a dataset. Select the data for the boxes in the box-and-whisker plot.
Step 2 Insert a Stacked Column chart. Format the stacked column chart to box and whisker chart. Fortunately the box and whisker plot is one of the 6 new charts introduced in Excel 2016.
Box and Whisker Plot Excel will ease your effort for presenting your data in much more nicer way. Select your dataeither a single data series or multiple data series. Create a box and whisker chart Select your dataeither a single data series or multiple data series.
Excel Box and Whisker Plot Box Whisker Plot in Excel is an exploratory chart used to show statistical highlights and distribution of the data set. Next calculate the differences between each phase. Create a stacked column chart.
Select All Charts Box and Whisker OK. In a boxplot the numerical data is shown using five numbers as a summary. Follow these steps after you calculate all the statistics.
Create Box and Whisker Plot in Excel After the R Excel is a wonderful tool for the statistics. Create a box plot Step 1. Create a box and a whisker graph.
First you need to calculate the minimum maximum and median values as well as. You can share as well as release your custom evaluation with others within your firm. You can further customize the look and feel of your Excel Box and Whisker Plot by going to Chart Tools Design Format.
If you want to be able to save and store your charts for future use and editing you must first create a free account and login -- prior to working on your charts. In this worksheet thats B21D23. Follow these steps how to create a boxplot in excel.
In the box and whisker plot the lower box edge corresponds to the first quartile and the upper box edge corresponds to the third quartile. Following are the steps to create a Box and Whisker chart. Click Box and Whisker.
Select INSERT Recommended Charts and then select the sixth option to add a stacked column chart to the worksheet. To begin create a. Five numbers of statistics are Minimum Value First Quartile Value Median Value Third Quartile Value and Maximum Value.
A box plot will automatically appear. Go to Insert tab. Create a stacked column chart.
Click Box and Whisker. In our example let us go to Chart Tools Design and pick one of the alternate designs. For example select the range A1A7.
Rows 20 and 24 dont. The line through the center is the median. You can do this by selecting cell A1 on the sheet below press Ctrl Shift right arrow followed by Ctrl Shift down arrow.
You are not logged in and are editing as a guest. Calculate the quartile values. The whiskers go from each quartile to the minimum or maximum values.
The data shown in the following illustration is a portion of the data used to create the sample chart shown above In Excel click Insert Insert Statistic Chart Box and Whisker as shown in the following illustration. If youre working with statistical data in Excel a box and whisker plot is one of the best charts you can use. Box and Whiskers chart.
You have your Excel boxplot ready.