If youre prompted for an administrator password or confirmation type the password or provide confirmation. In the left pane choose Create a system image and then follow the steps in the wizard.
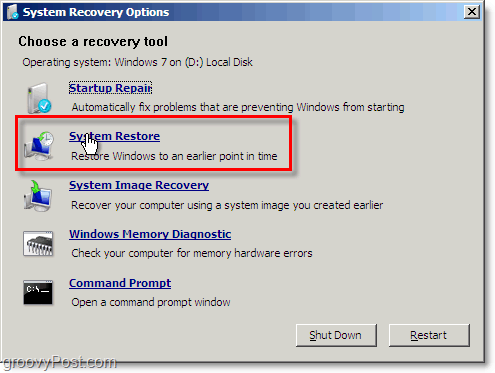
Fix Windows 7 With A System Restore Point How To
Right-Click on My Computer and then Click on Properties.

Creating restore point windows 7. Now on the System Properties Windows. Create system restore point windows 7. Hit Start type restore and then click Create a restore point On the System Protection tab click the Create button.
Manually Create System Restore Point in Windows 10. In the search box on the taskbar type Create a restore point and select it from the list of results. Just follow these steps.
On the System Protection tab in System Properties select Create. Click the System Protection Tab click Create. As soon as you click on Create a restore point Windows will have the System Properties window appear before your eyes and you can move on to actually creating a System Restore point.
Thats all about manually creating a restore point in Windows 7. 2 Click the System protection link in the left frame. Click on System Protection Option on the left pane.
Create a system image. Plus for users of Windows 7 and Windows 8 creating System Restore Points is even quicker and easier with this program. The System Properties dialog screen opens up.
Now on the System Protection Tab. Step 2 Select the System Protection option on the left side of the window. Finally if youve created the restore point in your Windows computer you can easily restore your system files to that restore point.
Restore Windows 7 to previous status with System Restore utility. Right-click on the SystemRestore key in the left pane and select New - DWORD 32-bit Value. A window will appear and click Next to go to the next step.
This opens the system properties window from the control panel. Type in a description for the restore point which will help you remember the point at which is was created. By default Windows allows you to create only one restore point every 24 hours.
In the System Protection dialog box type a description and then click Create. Click Start type create a restore point in the search box click Create a restore point to open the System Properties window. Click the System link.
If you prefer the GUI to launch the System Restore Properties dialog do a search for restore point in the Start menu or from Control Panel. Creating a system restore point manually in Windows 7 is not so tough. Step 22 Then select the System Protection tab to get the main System Restore Setting.
You can also create manual System Restore Points at any time on your computer. In the System Protection dialog box type a description and then click Create. Creating a Restore Point Press WinKey R to bring up the Run dialog.
To remove this limitation open Registry Editor and navigate to. Type a description for your restore point that will help you remember why you created it and then click Create. Just pin this program to the Taskbar and you have the ability to quickly.
It will list the. Button to create. Right-click the Start button then select Control Panel System and Maintenance Backup and Restore.
Finally if youve created the restore point in your Windows computer you can easily restore your system files to that restore point. How to Create a System Restore Point in Windows 7. Click on the search result titled Create a restore point.
Right click on the Computer icon from the desktop or Start menu and select Properties. How to Create S ystem Restore Point Manually. Click on the Start menu type restore and click Create a Restore Point.
Click the System Protection Tab click Create. Create a system restore point. How to create system restore point in windows 10Please Subscribe and Support AD Tech Tips.
Choose StartControl PanelSystem and Security. Type create a restore point in the Search field in your computers taskbar. Click the System Protection link in the left panel.
Click the Create button. Click the Start menu right-click Computer and then click Properties. Type SystemPropertiesProtectionexe and press ENTER.
First of all Click on Start Button. Thats all about manually creating a restore point in Windows 7. System images contain all of the info on your PC at a particular state.
Just click on the Starts Button then right-click on Computer and click on Properties. By default Windows 10 is known to automatically Create Restore Points before installing a major Windows update critical driver updates and whenever any major programs are installed. In the System Properties dialog box that appears click the System Protection tab and then click the Create button.
You can manually create System Restore points which is very useful if you have your system working well and want to have a reference point you can revert back to in case things go wrong.
Right-click any empty area of your desktop and then click Screen resolution. When you connect an additional monitor to your Dell PC Windows automatically detects the monitor and displays your PCs desktop screen.

Dual Monitor Problem Windows 7 Help Forums
Make sure your cables are connected properly to the new monitors then press Windows logo key P to select a display option.

Dual monitors windows 7. Although there are several third party solutions that allow duplicating the taskbar on secondary monitors they still have no or just partial support of the new taskbar features presented in Windows 7. Your PC should automatically detect your monitors and show your desktop. It features hotkeys that help you to move windows around from one monitor to the others.
How to Set up Dual monitor for Windows 7. Select the Extend display. If you need more help heres what to do.
How to set different wallpapers for multiple monitors in Windows 7 To start out right-click on the desktop of both monitor and choose Personalize from the context menu and choose Personalize. Connect your second monitor. Turn on both the monitors and power up the system.
To get your PC to recognize multiple monitors. Once Plugged right-click on the desktop then go to screen resolution. Insert your secondary display adapter secure it properly with a screw reassemble your system and reconnect the power.
Click the Multiple displays drop-down list and then select Extend these displays or Duplicate these displays. Use multiple monitors with Windows 7s Remote Desktop Connection by Greg Shultz in Windows and Office in Hardware on March 1 2012 306 AM PST In Windows 7 you can connect to a remote computer. Settings will open to the Personalization part of the place youll need to select Background from the checklist on the left.
Dual Monitor is a free and open source system taskbar software download filed under desktop enhancement software and made available by Cristi Diaconu for Windows. Plug your display cable to your computerlaptop and external monitor. Then you are good to go.
A theme is a combination of desktop background pictures window colors and sounds. Dual Monitor Tools As the name suggests Dual Monitor Tools is one of the best software in the category. On Windows 7.
Right click on your desktop Select the Screen resolution Click the button Identity to view which monitor is which one Then drag and drop them in the window. If youre using a wireless display adapter connect to an HDMI port on newer TVs then wirelessly connect your PC to it. Easily extend your taskbar to a second monitor when connected.
Check for Windows updates. Select Start Settings System Display. If you dont see a dual-monitor display near the top of your monitor screen click Detect or check to make sure the monitor is connected properly.
You can set up as many as four monitors. Microsoft Windows 7 and later operating systems support multiple monitor setups which can help enhance productivity. The screen shot for this step is.
Learn how to connect dual monitors on computers with Windows 7Chapters0000 Introduction0017 Requirements for connecting a second monitor0026 Identify vi. Connecting two monitors can be accomplished by pressing a hotkey or modifying your screen resolution settings. To check for updates select Start Settings Updates Security Windows Update Check for updates.
Allow the system to boot into Windows 7. You can then choose how you want your desktop screen to appear. By the Screen Resolution menu 1.
In this video we show you how to set up a dual monitor system using the default Windows 7 configuration toolsFirst we will give instruction on physically h. Start your PC and log in and turn on your monitor. To get a theme expand one of the categories click a link for the theme and then click OpenThis saves the theme to your PC and puts it on your desktop.
If you cant find a. The review for Dual Monitor has not been completed yet but it was tested by an editor here on a PC and a list of features has been compiled. Actual Multiple Monitors is the first and only multi-monitor software that provides the exact replica of Windows 7 Taskbar on secondary displays.
Click the 1 box to set up your first monitor and 2 to set up the second. Connecting two monitors to your Windows 7 computer will allow you to review and work on documents using both screens and can even help with ergonomics. After you log in Windows 7 detects your new display adapter and may bring up the Add.
You see the Display Settings. How to Set Up Multiple Monitors with Windows 7 Right-click in any blank place on the Windows 7 desktop and choose Screen Resolution.
The other editions focus on other markets such as embedded systems or enterpriseAll editions except RT support 32-bit IA-32 CPUs and x64 CPUs. Windows CE is a distinctly different kernel rather than a trimmed-down version of desktop Windows.
Windows 8 1 Product Keys 2021 Download For All Editions 64 Bits

Windows 8 or Windows 8 Pro WIndows 8 or Windows 81 or Windows 81 Update It is easy to determine if Windows 8 is being used because that is Windows version 62 and Windows 81 and Windows 81 Update are version 63.
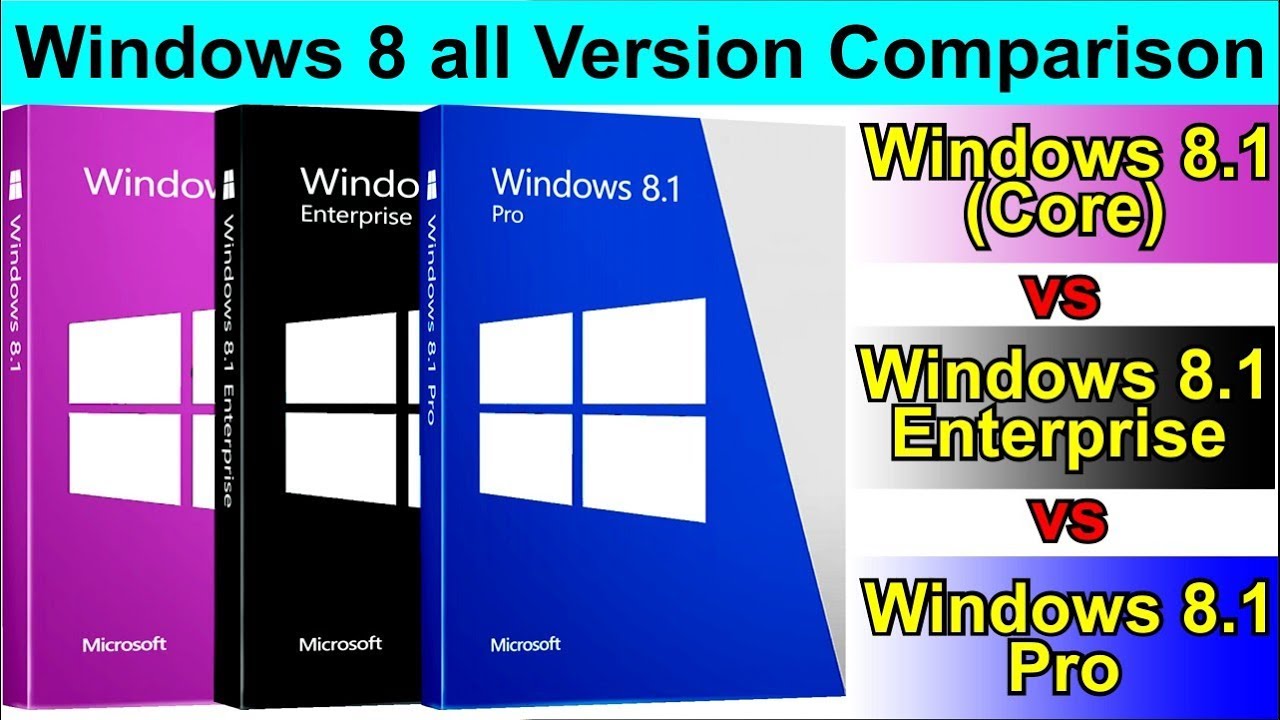
Different versions of windows 8.1. This applies to the following editions. Windows 81For most consumers Windows 81 is the best choice. Different Versions of Windows 81 on mulitple computers and upgrading to windows 10.
Microsoft a few days ago just put up comparison chart that lists all the features along with new tools available in different versions of Windows 81 Windows RT 81 Windows 81 Edition Windows. Microsoft offers four main versions of Windows 8 but youll probably want only one. With Windows 8 Microsoft has essentially.
Windows edition with the addition of those extra links for K editions. Windows 10 and 20 were the first versions of Windows made. With Windows 7 customers had to wade through the features and capabilities of seven different versions to choose the Windows 7 to meet their needs.
The logo slightly resembles the Windows 8 81 and 10 logo except that the vertical lines were in different places. Windows 81 ProThis. In a nutshell the five Windows versions and targeted customer bases look like this.
Basically no one really uses Windows 8 anymore and therefore they are trying to get everyone upgraded to Windows 10. Windows 8 a major release of the Microsoft Windows operating system was available in four different editions. I have a non OEM copy of Windows 81 that I bought when I built my computer so I can put it on other computers if I needed to.
Windows RT quite possibly the worst name Microsoft has ever given any product isnt really Windows. Small businesses will choose Windows 8 Pro and larger businesses will want Windows 8 Enterprise. It was released to manufacturing on August 27 2013 and broadly released for retail sale on October 17 of the same year about a year after the retail release of its predecessor.
Support ended on December 312001. Enterprise Enterprise N N Pro with Media Center Professional Professional N SL Support Dates. The teams working on Neptune and Odyssey combined to work on Windows XP.
Windows 81 was made available for download via MSDN and Technet and available as. Windows NT Server designed to act as a server in networks and Windows NT Workstation for stand-alone or client workstations. Windows Odyssey a version intended to be an update to the Microsoft Windows NT 5x codebase.
There are actually two versions of Windows NT. Windows 81 Version Comparison. It is supported on Intel x86 and compatibles MIPS ARM and Hitachi SuperH processors.
The original blue logo was removed and replaced with a darker Windows logo with a black-and-white gradientThis logo. Windows 8 Core Pro Enterprise and RTOnly Windows 8 Core and Pro were widely available at retailers. I have listed the download links for the different Media Feature Packs below.
These versions of Windows were just to add a visual guide to DOS. Windows 81 is an operating system that was produced by Microsoft and released as part of the Windows NT family of operating systems. The Four Flavors of Windows 8 The Version of Windows 8 What It Does Windows RT Designed for long-battery life.
Windows 81 follows the Fixed Lifecycle Policy. This is the version sold to the European market and is missing Windows Media Player Windows Media Center and Windows DVD Maker. Windows 81 for Emerging Markets is tailored for specific countries and available only in specific languages.
If you currently run Windows 7 Professional Windows 7 Ultimate Windows 81 Pro or Windows 81 Pro for Students this will be the version you are automatically upgraded to free of charge. Windows NT New Technology is a 32-bit operating system that supports preemptive multitasking. More visibly what was My Computer appears as Computer in Windows 8 and as This PC in Windows 81 or Windows 81 Update.
Windows Embedded Compact Windows CE is a variation of Microsofts Windows operating system for minimalistic computers and embedded systems. Upgrade Windows 81 to Higher Edition As of October 2015 Microsoft no longer sells upgrade packs to Windows 8 or 81 Home to Windows 8 or 81 Pro. The aptly titled Windows 8 version.
40 1993-1996 A version of the Windows operating system. Windows 10 Media Feature Pack for N and KN editions. It possesses all required functions for daily work.
Windows RT 81It provides customers with same features as Windows 8 such as easy-to-use interface Mail SkyDrive. As the name suggests this is the flagship mobile version of Windows 10.
Step 2 Click on Accessories then click on System Tools. It will let you defregment more files which cannot be defregmented in normal mode due to exclusive access.

How To Defrag Windows Vista 9 Steps With Pictures Wikihow
Then you can type the following to change the size.

Defrag windows vista home premium. In Windows Explorer aka the Computer icon right-click on the drive you want defragmented. PerfectDisk is a great defragmenter that defragments all files including metadata files and consolidates free space completely. I am very computer literate and I understand about defrags and its purpose.
Many think it is the best defragmener available today. Vssadmin list shadowstorage This will show you how much disk space System Restore is using. TP-LINK TL-WN722N Free Driver Download for Windows 7 Vista 2003 XP 2000 - Autorun.
Raxco Software Windows Products - PerfectDisk 80. System defragment on windows vista home premium. Windows Vista Home Premium German Disc Multiple Languages OEM Addeddate 2020-03-29 053442 Identifier windowsvistahomepremium Scanner Internet Archive HTML5 Uploader 164 Year 2006.
Vistas defrag is quite innovative and a departure from the XP days but sadly lacking in some areas. Step 1 Click on the Start menu then click on All Programs. How do i defragment my windows vista home premium program.
You can also try to defragment in safe mode. Disk Defrag is the best free disk defragmenter software that will speed up your hard drive and computers overall performance by optimizing file system. Sharing is caring and that is the only way to keep our scene our community alive.
Maxsize3GB Change the Maxsize to whatever you want. You should consider to submit your own serial numbers or share other files with the community just as someone else helped you with Microsoft Windows Vista Home Premium serial number. Use full screen mode in viewing for optimal performance.
Once I close out of it the Next scheduled run line switches. If you can live with those limitations then Vistas defrag does the job reasonably well--barracuda-----. So I clicked Defragment Now and after the defragmenter had finished the same recommended option came up.
Features can be seen here. When I go to the status window I note that the Next scheduled run line the correct timedate is indicated. Last but not less important is your own contribution to our cause.
Step 3 Click on Disk Defragmenter then type the administrator password to confirm you want to open Disk Defragmenter. You cannot change the settings for a file backup operation or use Windows Task Scheduler to change the defrag schedule in Windows Vista. Windows Vistas Disk Defragmenter is configured to run on a regular schedule right out of the box.
Hi was doing a bit of cleaning up on my computer today but ive notcied recently everytime i do a system defragment i keep losing a 1gb from my hardrive example before i did the system defragment i had 180gb capacity on hardrive but after the defragment finished i only had 179gb left and its doing it everytime lol any suggestions what this. In the task window I select the timedate. I tried to defragment my C.
How To Defrag Windows Vista Home Premium. Windows Vista Home Premium by Microsoft. Home Forums Hardware Software and Accessories Windows OS and Software Disk Defragmenter in Windows Vista Home Premium Discussion in Windows OS and Software started by ATR90 Sep 3 2007.
How to defragment a disk drive in Windows Vista. Open up a command prompt as Admin and type. Vssadmin Resize ShadowStorage ForC.
Publication date 2006 Topics Windows Vista Home Premium Language Multiple. Ive only had this computer since 22nd Sept and Windows has these silly defrag option thing any way. Windows Vista Business Windows Vista Enterprise Windows Vista Home Premium Windows Vista Home Basic Windows Vista Ultimate Windows Vista Business 64-bit Edition Windows Vista Enterprise 64-bit Edition Windows.
And act as an. And when it runs its hidden in the background with no visible interface or icon. The scheduled defragmentation feature in my Vista does not appear to work.
PerfectDisk is a Microsoft Certified Vista Defragger made by Raxco Software. It is recommended that you defragment now. I want to defrag my computer because my free Windows 7 Home Premium 64 upgrade arrives through the post on Monday and I was wondering why defragging takes so long on this system.
Drives using Disk Defragmenter on Windows Vista Home Premium 32-Bit this was recommended Your file system performance can be improved.
Actually it is subject to go wrong as well as clean insufficiently. Click the Windows icon in the taskbar Type Disk Cleanup in the Start Search box and then press Enter.
Free Disk Cleanup Software Download For Windows 10 8 1 8 7 Xp
Disk Cleanup is designed to free more space on your hard drive and keep your Windows operating system clean of unnecessary files that you wont use.
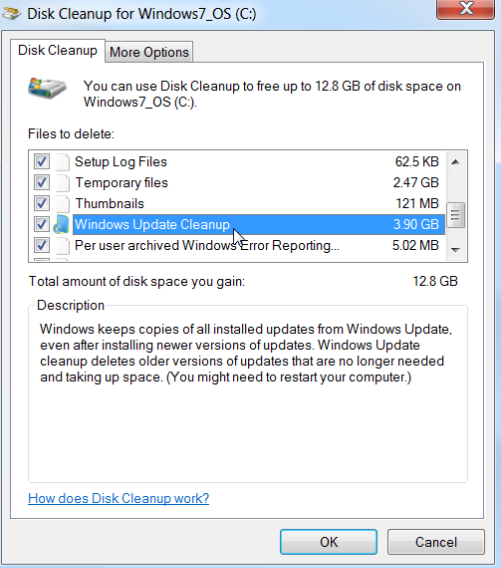
Disk cleanup on windows 7. To run Disk Cleanup on a Windows 7 computer follow these steps. Protect yourself from fraud with technical support. You can use the built-in Disk Cleanup tool to remove temporary files and other unnecessary items and you can.
Alternatively you can just search for Disk Cleanup in the Start Menu Click the Disk Cleanup button in the disk properties window. To open Disk Cleanup on a Windows Vista or Windows 7 computer follow these steps. To launch the Disk Cleanup tool access the Start Menu or the Start Screen and type Disk Cleanup.
CwindowsSYSTEM32cleanmgrexe d Drive Note In this command the placeholder Drive represents the drive letter of the hard disk to be cleaned. Once you launch Disk Cleanup if you have more than one hard disk in your system youll be. More Information Start the Disk Cleanup wizard.
Go to All Programs Accessories System Tools. Click on delete files. After the cleanup finishes the Disk Cleanup window will automatically close.
July 29 2020. In Windows Vista choose the option My Files Only. How to Free up Disk Space Windows 7.
Select Drive C from the drop-down menu. Protect Yourself From Fraud With Technical Support. Click Start type cleanmgr in the.
To access it right-click one of your hard drives in the Computer window and select Properties. A confirmation text Are you sure you want to permanently delete these files will appear. To run Disk Cleanup in Windows 7 and Windows Vista follow these steps.
Click Start type cleanmgr in the Start Search box and then click OK. - This option specifies the drive that you want Disk Cleanup to clean. To start the Disk Cleanup tool either run the Cleanmgrexe command or click Start point to Programs point to Accessories point to System Tools and then click Disk Cleanup.
The Disk Cleanup utility removes unnecessary files to free up space on the disk drive of your choice. Removing Windows temporary files To start Disk Cleanup in Windows 7 perform the following steps. To do this use one of the following methods.
You should take immediate measures to repair these corrupted files. This wikiHow teaches you how to free up space on your Windows 7 computers hard drive. Click Start click All Programs click Accessories click System.
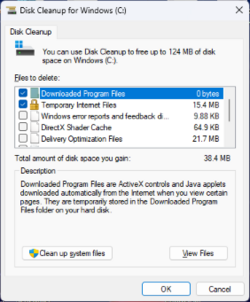
Select the types of files you want to delete and click OK. Choose what type of files and folders to delete at the Files to delete section. Need to run DISM online cleanup image in Windows 7 Everything goes fine until you find that Windows updates and service packs fail to install or the system is having instability issues and other strange problems.
To free up drive space in windows 10 click on Clean up System Files Select the drive Select the files to clean up Press OK. To start the Disk Cleanup tool and specify the hard disk to be cleaned by using the command line follow these steps. Click Start and then click Run.
Click All Programs Accessories System Tools Disk Cleanup. The time that the cleanup process takes will vary but itll probably take longer if these files have built up in your system. By enable disk cleanup app in Windows 10 you can clear unnecessary system drive files as well.
Disk Cleanup supports the following command-line options. Attention corruptions may occur in system files. Tutorial for using the Windows 7 Disk Cleanup Wizard.
From the Start button menu choose All ProgramsAccessoriesSystem ToolsDisk Cleanup. Run Disk Cleanup in Windows Vista and 7 Run from My Computer. Start with your own files first.
If that doesnt remove enough files. In the Open box type the following command and then press Enter. In this Windows 7 Tutorial Video we will cover how to use Windows 7 System Tools Disk Cleanup system utility to delete temporary files.