Gradients range from a simple linear change from one color to another to multiple colors combined in varying patterns to create different effects. Create a smooth gradient Select the Gradient tool.

Creative Coloring With Gradient Maps In Photoshop Phlearn
Click inside the gradient sample in the options bar to display the Gradient Editor dialog box.
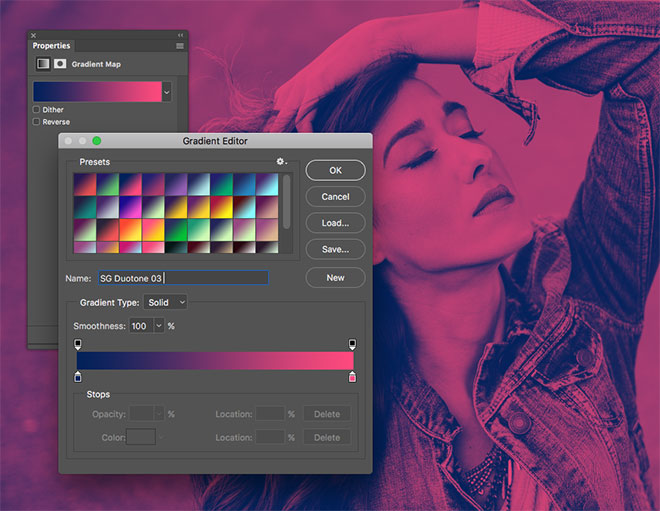
Gradient map photoshop cs6. Clicking on the Gradient Map icon in the Adjustments panel. The Photoshop Gradient Map Tool is great for altering the look and feel of your photographs. You can use them to make a photo look soft and gentle harsh and edgy or anything in between.
The new Photographic Toning presets have been added to the Gradient Map image adjustment which means we first need to add a Gradient Map adjustment layer to our document. How to Create gradients. 32 Photoshop Gradients for Photoshop.
They are helpful for planning raster design as well as vector representation too. You can use it on fashion portrait landscape product commercial really all photography and even illustrations. You can either create your own or use a preset one.
Yes you can use these in your creations for Zazzle and Cafepress. If you specify a twocolor gradient fill for example shadows in the image are mapped to one of the endpoint colors of the gradient fill highlights are mapped to the other endpoint color and midtones are mapped to the gradations in between. You also can use the Gradient Map to colorize a black-and-white image or to change the colors in a color image.
In this Photoshop tutorial you will learn. Photoshop gradient is an extremely useful tool for painting a particular area in a special style as gradient helps you in designing a blend between different colors. In Phtoshop CS6 gradient maps convert your image to grayscale and then replace the range of black gray and white tones with a gradient of your choice in effect colorizing your image often in startling ways.
Gradients are commonly used in web and graphic design. A Photoshop gradient is an effect in which one color shade or level of brightness fades into another. Then when you open the gradient map the colors are already in place.
Open the Gradients panel WindowGradients Only in Photoshop 2020 or newer here for earlier versions of Photoshop. If for example our current Foreground color was red and our Background color was purple and we applied a Gradient Map adjustment wed end up with a photo made up of reds and purples. Click on the panel menu and choose Legacy Gradients You will see a whole library of gradients load up.
By default Photoshops Gradient Map adjustment uses a gradient thats based on our current Foreground and Background colors. Photoshop fuses inclination apparatus which is exceptionally easy to utilize but intense. Gradient maps are a Photoshop CC tool that creates a new adjustment layer which choose a new color for each pixel of a certain value.
Unlike the other tools however the Gradient Map gives you a lot of control over how your image is converted. Once youre used to how they work you will learn to manipulate them to create a unique style. Here are some of the gradients I use for the floral brushes I have offered you.
Click on the Gradient Map icon in the Adjustments panel far right bottom row. Download assets and FREE starter Gradient Maps. Do not collect.
Photoshop gradients are one of a kind assets. Free to use commercially or for personal use The only thing I DO ask is that you. Photoshop offers many ways to convert an image from color to black-and-white.
Creating gradient maps The simplest way to create a gradient map in Photoshop is to go to your toolbar and set the background and foreground colors to the ones you want at either end of your gradient. How to find more gradient maps. In laymans terms the darkest areas of your gradient replace the shadows and below of your image the middle replaces your general exposure and the end replaces your highlights.
Play with the Alignments and Angles to get different effects. Make stellar metallic. In this Photoshop tutorial Colin Smith shows you how to use gradient maps for color grading photos.
Do one of the following. They can help your Photoshop as it were. In the Photoshop CS6 it is more convenient firstly to work with the preset gradient and then create your incredible gradient.
Having a large collection of. Click the Gradient Map icon in the Adjustments panel. 100 free photoshop software download 1000 photoshop tutorials adobe illustrator gold gradient swatches free download adobe illustrator styles free download adobe photoshop cs6 plugins pack free download background psd free download 2017 hd beautiful gradients best gradients best photoshop gradients free download christmas gradient background cool card wallpapers cool gradient backgrounds.
How to use Gradient Maps. To base the new gradient on an existing gradient select a gradient in the Presets section of the dialog box. Gradients are commonly used in web and graphic design.
Go back to your gradient Map layer and click on the properties panel. Presently you can include a touch of style and class to your web design project with these extreme metal gradients.
As I said before you wont have to change your image permanently. Image gets pasted in as Layer 1 NOT as background 4.
How To Use Content Aware Fill In Photoshop Light Stalking
Photoshop CS5 saw the introduction of content-aware filling.
Fill in photoshop cs6. The Fill value on the other hand affects only the actual contents of the layer which in my case here was the text. Choose Edit Fill to fill the selection or layer. From print screen 3.
Layer styles which Photoshop treats as separate from a layers actual contents remain 100 visible and are unaffected. Make a new layer beneath the text layer and sketch out a rectangle with the Rectangular Marquee tool covering all the text. Select a fill color as the foreground or background color.
Select an object to remove. Press D to make your foreground and background colors the default black and white then use Command Backspace Ctrl Backspace to fill the selection with the background color. Make a quick selection of an object you want to remove using Select Subject the Object Selection Tool the Quick Selection Tool or the Magic Wand Tool.
Photoshop CS6 Extended Win 8 64bit. Go to Edit Define Pattern to open the Define Pattern dialog box. In the Fill dialog box choose one of the following options for Use or select a custom pattern.
How To Make a New Layer in Photoshop Cs6 In 2021. Why do we usually need that. You should be able to create a new file make a selection and then click Edit Fill and fill the selection.
Otherwise use the Rectangle Marquee tool to make a selection. This is where you can make a selection choose Edit Fill and fill using the Content-Aware fill mode as shown below. If you want to use the entire image as your fill go to Select Select All.
Or to fill a path select the path and choose Fill Path from the Paths panel menu. Select an area with rectangular selection tool. The Photoshop app looks like a Ps icon in a blue square.
When I do that in PS CS6 it brings up the fill dialogue box and I dont see any transparency fill options. Open the image youd like to use as a fill. In this example the tool did a pretty good job with filling in some of the content but not so good with a few areas.
Thats because they let us add elements on our picture and work on it individually. In the previous tutorial How To Draw Vector Shapes In Photoshop CS6 we learned how to use the five basic shape tools in Photoshop the Rectangle Tool the Rounded Rectangle Tool the Ellipse Tool the Polygon Tool and the Line Tool to add simple geometric shapes like rectangles squares and circles as well as stars starbursts and direction arrows to our documents. Now in Photoshop CS6 there is also a Content-Aware mode when working with the patch tool.
This button is on a tab bar in the upper-left corner of your screen. To use it select the tool press ShiftG until its. Now keep in mind you must make your selection on a valid raster layer.
Get met with white hole. Type and Shape Layer. One of the virtuous things we cant transpire is how to make a new layer in Photoshop.
In the Color panel use the color sliders to mix your desired color. Click the File tab. Adjustment layer In Photoshop.
A quick guide to changing the fill color property of a shape layer in Photoshop CC 2020 2019 2018 2017 CS6 etc - the fill color of a shape can be changed i. Here is the final result of example 3. Open Adobe Photoshop CC on your computer.
So you cannot do this on a regular type layer vector layer or smart object. It will open your file options on a drop-down. In Photoshop CS6 the Paint Bucket tool available in the Tools panel where it shares a flyout menu with the Gradient tool operates much like a combination of the Brush tool and the Magic Wand tool as you can see by looking over its options.
To fill an entire layer select the layer in the Layers panel. Right-click within the selection and choose Content-Aware Fill. As in the previous 2 examples go to EditFill and choose Content Aware in the drop-down menu.
Adobe has just uploaded a very quick-but-useful tutorial that will help you get more realistic results when using Photoshops Content Aware Fill tool by altering one lesser-known setting. The Opacity value controls the transparency of anything and everything on a layer including layer styles. At this point a bit of work with the Clone Stamp andor Healing Brush tools will finish the job.
In that situation you can enable the tune color brightness saturation and so on using this layer. You can find it on your Start menu on Windows. And thats the difference between Opacity and Fill.
In previous versions of Photoshop if you had a selection you could hit the delete key and the selection would be filled with transparency. Learn how to draw a circle without fill in Adobe PhotoshopDont forget to check out our site httphowtechtv for more free how-to videoshttpyoutubec. The fill layer contains solid color pattern and nice gradient.
The Fill dialog box appears. 6 hours ago 3 min read. In this dialog box under Contents you can select whether to fill with the foreground or the background color.
Paste in image from clipboard ie. Now at this point I want to content-aware-fill the selected area.
The feather adjustment is located under Select Modify Feather or your can use Photoshops keyboard shortcut and press Shift F6 to bring up the adjustment window. Click in the center of the curve.
How To Feather Edges In Photoshop Youtube
When we want to isolate a particular part of an image we need feathering.
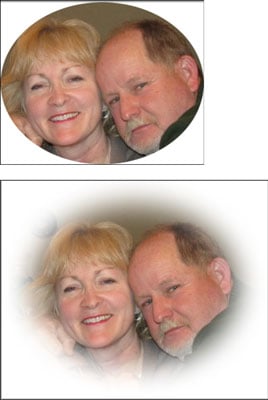
Feather edges in photoshop. Photoshop refers to softening the edges of a selection as feathering the selection and there are plenty of times when we need to feather our selection edges since not everything we need to select has edges that are sharp and clearly defined. How to Feather in Photoshop. Using any selection method create a selection around the part of an image you want to lighten.
SelectModifyFeather ShiftF6 To make soft edges in Photoshop click on Select Modify Feather. Select the Rectangular Marquee or Elliptical Marquee from the Tools panel and draw a marquee around the section youd like to keep. Feathered edges show gradual transitions in opacity.
The first thing to do after you open the Photoshop application is to open your image. Selection modifiers in Photoshop CS5 are very helpful in certain situations so learning how to use them and simply knowing that they are there is a good way to improve your use of the program. Type a value between2 and 250 in the Feather Radius text box and click OK.
Luckily for you guys feathering in Photoshop is not particularly hard and with the guidance of me Eddy you will be able to feather your way through the harshest of situations from here on. Now navigate to Select Modify Feather from the upper menu bar. Image courtesy Adobe Systems.
Usually we use feathering for various purposes. This simple guide is the answer. In the Feather dialog box that appears enter 25 in the Feather Radius text field and.
So choose a background that you want your main image to blend into. The image will open in a new tab in photoshop. When I paste the object I merely get a rectangular line no photo.
Define a feathered edge for an existing selection In the Edit workspace use a selection tool from the toolbox to make a selection. Open the image to which you want to apply the feather modifier to a selection. When youre happy with your selection you can more onto the next step.
Photoshop offers various tools for selecting a portion of an image. The first way is to adjust your settings in Properties Menu after the masking process. Depending on the pictures resolution the final effect after you apply feathering will be different.
The feather option in Photoshop gives us a great advantage for the softening images edge. Choose Select Feather. If you are using Photoshop CC go Filter fx Vignette or Post Crop Vignette.
In this tutorial were going to learn how to quickly soften edges in Adobe Photoshop- - - - - - - - - - - - - - - - - - - - - - - - - - - - - - - - - - - -. Youll be working in this tab now to feather the image. Select part of the image.
Then select the Elliptical Marquee tool and in the Options bar set Feather to 0. This sounds perfect except that when I use the rectangular marquee tool and create my selection feather is not available it is dimmed When I select all and choose Modify Border Feather appears but it doesnt give the effect you describe. Set Feather Radius OK.
We also need this great feature to make an artistic portrait or highlight a specific area. I am using Photoshop 60. Here is the result when you paste your selection on the new layer.
The feather radius determines how quickly the feather fades your image. Feathering in photoshop is a skill that will add some style to your images and the good news is that this wont be a huge tutorial. Move the amount slider to the right which will produce a white feather.
How to Feather in Photoshop First load your current Photoshop project and decide which image needs feathering. When you click Feather a dialog box will expand that allows you to input a feather radius. This works on the layer selected.
Once you have your project created open the image you want to feather the edges of by going to File Open. To reposition the selection click in its center and drag it. There are the usual.
In the images you edit in Adobe Photoshop feathered edges create gradual transitions from fully opaque to at least partially transparent. Feathering is mainly used to create a vignette effect on photos. Feathering is also called blurred edges.
The other controls let you control the shape etc. On selections masks and layers feathering fades out sharp boundaries. Access the Marquee tool to make a selection that youll copy and paste on the new image later complete this step.
You can also use the Pen tool to draw a more precise path. If after creating the selection you want to alter its dimensions choose Select Transform Selection and make the adjustment.